Thursday, June 21, 2012

Share You PC’s Internet Connection with Android via USB

clip_image002

People often “tether” their computers to their smartphones, sending their computer’s network traffic over the device’s cellular data connection. “Reverse tethering” is the opposite – tethering your Android smartphone or tablet to your PC to use your PC’s Internet connection.

This method requires a rooted Android and a Windows PC, but it’s very easy to use. If your computer has Wi-Fi, it may be easier to create a Wi-Fi hotspot using a utility like Connectify instead.

Prerequisites

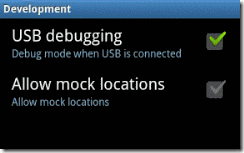
Before using this utility, you’ll have to enable USB debugging on your Android phone or tablet – open the Settings screen, tap Applications, tap Development, and tap the USB Debugging checkbox.

clip_image004

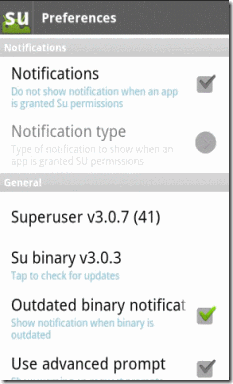
You will probably also want to disable SuperUser access notifications, or you’ll constantly see the SuperUser notification. Launch the SuperUser app on your device, open its menu, tap Preferences, and uncheck the Notifications check box under Notifications. If you don’t see the SuperUser app on your Android, your device probably isn’t rooted.

clip_image006

You’ll also need your device’s USB driver installed on your computer. You can get this from your device’s manufacturer or try downloading a generic driver from Google.

Android Reverse Tethering Tool

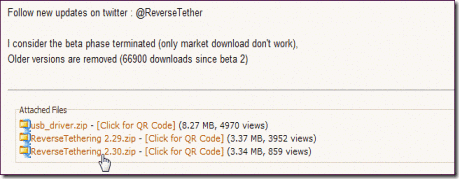
Android Reverse Tethering is a Windows utility that uses ADB – also known as Android Debug Bridge – to share your computer’s Internet connection with your Android over USB. It includes its own copy of ADB, so you don’t even need the Android SDK installed on your computer. You can download it from here – scroll down and click the latest ReverseTethering .zip file in the Attached Files section.

clip_image008

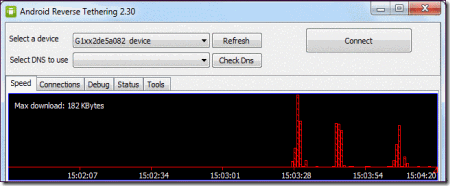
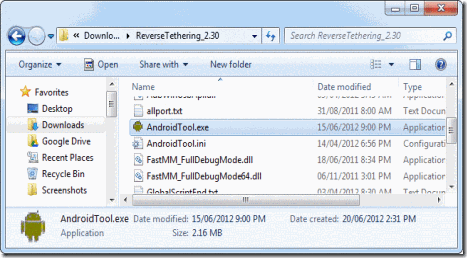
Extract the downloaded .zip file and run the AndroidTool.exe application inside its folder.

clip_image010

Connecting

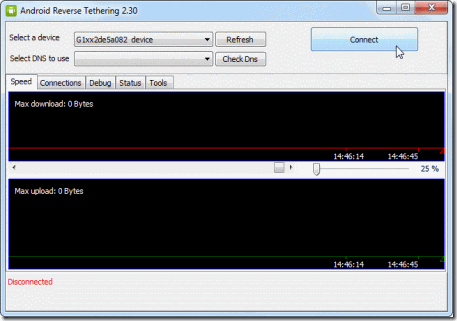
Plug your Android smartphone or tablet into your computer with its USB cable, select it from the Select a device drop-down box, and click the Connect button in the Android Reverse Tethering Tool application. It will connect to your Android and install the required software (Busybox and Redsocks) on it.

clip_image012

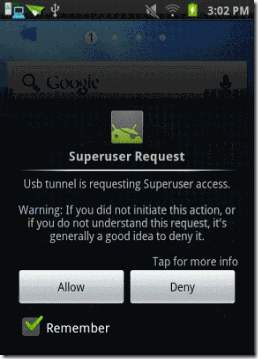
Tap the Allow button in the SuperUser prompt to allow the USB Tunnel tool on your device.

clip_image014

If you encounter a crash, close the Android Reverse Tethering Tool application and start again. You can also try clicking the Kill ADB button on the Tools tab to relaunch the ADB process. You’ll see a connection notification when the tool establishes a connection.

clip_image016

Usage

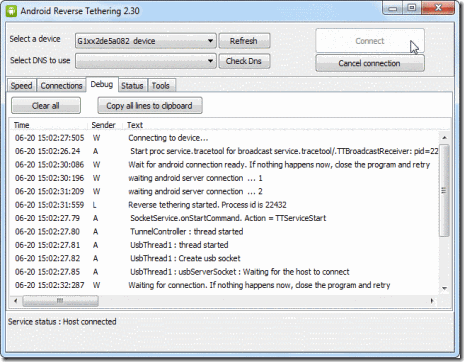
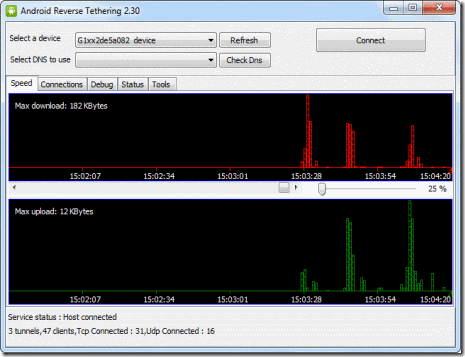
After the setup process is complete, you can open apps on your device and use the Internet. Your Android will forward network traffic over the USB cable to your computer, where it will take advantage of your computer’s Internet connection. The Windows application shows information about the forwarded connections.

clip_image018

Some applications may complain that you don’t have an Internet connection, although most (with the notable exception of Google Play app downloads) will work properly. You can work around this problem by connecting to a 3G or Wi-Fi connection before activating reverse tethering – Android will think you have a normal connection, although all data will be send through your USB cable and not over the air.

Taken From: http://www.howtogeek.com/117118/how-to-connect-your-android-to-your-pcs-internet-connection-over-usb/

Sunday, June 10, 2012

Changing The Language & Keyboard Layout – Linux Distributions

Version 1.0

Author: Oliver Meyer <o [dot] meyer [at] projektfarm [dot] de>
Last edited 04/03/2008

This document describes how to reconfigure the default language and the keyboard layout on various distributions so that they suit your location. I made this howto for our VMware images where the keyboard layout is always set to German and a few users have problems to configure the language and keyboard layout on these images.

This howto is a practical guide without any warranty - it doesn't cover the theoretical backgrounds. There are many ways to set up such a system - this is the way I chose.

1 Preliminary Note

If you're using a system with a desktop environment like Gnome or KDE you should use its tools to configure the default language and the keyboard layout. In the following steps I'll show you how to change the default language and the keyboard layout within the console on various distributions.

2 Fedora 8 Server / CentOS 5.x

2.1 Default Language

system-config-language

2.2 Keyboard Layout

system-config-keyboard

3 Debian Etch Server

3.1 Default Language

dpkg-reconfigure locales

3.2 Keyboard Layout

dpkg-reconfigure console-data

4 Ubuntu 7.10 Server

4.1 Default Language

sudo set-language-env -E

4.2 Keyboard Layout

sudo dpkg-reconfigure console-setup

5 Mandriva 2008 Server

5.1 Default Language

localedrake

5.2 Keyboard Layout

keyboarddrake

6 Suse 10.X Server

6.1 Default Language

yast2

Select "System" on the left side and then "Language" on the right side. Change the language and save the settings with "Accept"

6.2 Keyboard Layout

yast2

Select "Hardware" on the left side and then "Keyboard Layout" on the right side. Change the keyboard layout and save the settings with "Accept".


7 Links

· Fedora: http://fedoraproject.org/

· Debian: http://www.debian.org/

· Ubuntu: http://www.ubuntu.com/

· Mandriva: http://www.mandriva.com/

· Suse: http://www.opensuse.org/

Taken From: http://www.howtoforge.com/changing-language-and-keyboard-layout-on-various-linux-distributions

Saturday, June 9, 2012

Make Your Own Portable Apps - Cameyo

Portable application are rapidly gaining popularity among the computer lovers.

They give us a lot of flexibility because we can carry our favorite applications along with us. They also come handy during operating system crash when we need to install all the applications again.There are a number of portable applications available on the net but they are not enough to meet our needs.

So why shouldn’t we try to make our own portable applications?

Now you must be thinking what the hell I am talking about. Building our own portable applications-Have I gone mad? I am talking like it’s a child play. OK guys! Stop doubting on my IQ and believe me or not-it’s really a child’s play. Guys when you are with me there can’t be any tension as I am a fun-loving guy. So just stay with me and watch the action with nude eyes.

Let’s start the work. So please download a cool software Cameyo Application Virtualization from this link and install it. Now the first phase is completed so let’s proceed.

clip_image002

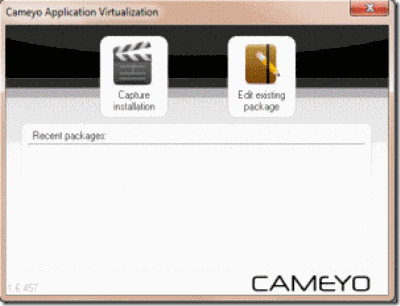
Now just start the application and you will see the screen like this. Now click on Capture Installation button. Now be patient as it will take some time to get the snapshot of your system.

Once this process is completed you’ll get the instruction to install the software whose portable version you want to create. So just install the desired software and when it’s finished click on the Install Done button. Now it will again take the snapshot of your system. So be patient till the process completes.

That’s all you need to do guys and our portable application is ready. But where it is? Chill guys and just see your Documents folder and there you’ll see a folder named Cameyo Packages. Open it and you’ll see a your portable installer ready. Wow! It’s cool. Now you can carry that portable software anywhere. Now I can bet that you’ve enjoyed this post. So now I’d leave but be back again with another show stopper.

Taken From: http://hackstips.wordpress.com/2011/05/12/make-your-own-portable-applications/

Thursday, June 7, 2012

Convert Windows Drives To Virtual Hard Disk (VHD)

Good morning guys! Today we will explore the world of Windows after a long time but this is quite interesting. Today we’ll learn to convert our hard disks to a Virtual Hard Disk. According to Wikipedia A Virtual Hard Disk (VHD) is a virtual hard disk file format, meaning it can contain what is found on a physical hard disk drive , such as disk partitions and a file system, which in turn can contain files and folders. It is typically used as the hard disk of a virtual machine.

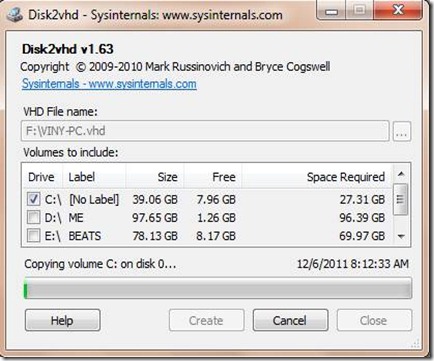
For this download Disk2vhd tool from Microsoft site. This is a small download and would take seconds to complete. You don’t even need to install it. Just run it and you’ll see all the drives existing on your system. Now select the drives you want to convert as VHD and click Create button. It will take few minutes based on the size of your drives.

clip_image002

This is the screen shot of converting my C drive to a VHD. The advantages of having a VHD is that you can use them to boot your Operating System in popular Virtualization tools like VMWare and VirtualPC. Even you can boot with a VHD in Windows7 Ultimate edition. So it’s like having a portable Operating System which you can use anywhere and anytime. So needn’t to say that it’s a handy tool to get and use.

Taken From: http://hackstips.wordpress.com/2011/12/07/converting-drives-to-virtual-hard-disk/

Saturday, May 26, 2012

How To Convert ePub files to PDF, MOBI, HTML (Calibre)

ePub files are an open publishing format to publish books and allow them to be read on multiple devices and platforms. ePub formats are popular on mobile devices, tablets and dedicated eBook readers like the Nook and Amazon Kindle. In fact, you can also read ePub books on your PC or Mac.

However, if you don’t have a compatible device to read ePub files, you can always convert ePub books to PDF format or MOBI format or HTML format and read them on any device.

One of the most famous software and freeware you can use to convert ePub files on Windows, Mac OS X and Linux is called Calibre eBook management (Download). This software not just allows you to manage your eBooks on a computer but also supports multiple formats along with the ability to convert eBooks among different formats.

In order to convert and ePub file to PDF, MOBI or HTML format, you will first have to add the books to the Calibre library using the "Add books" button. Once you have done that, click on the book and then click on the "Convert books" button in the top menu.

clip_image002

Once you have clicked that button, you will be shown several formats to convert the book to. Choose the format you want to convert the book to from the "Output Format" dropdown. You can make several other changes to the output using the left hand side menu. Once you have selected all the options, click on the "OK" button and Calibre will start a job to convert the book into the desired format.

The conversion process for ePub format to PDF, MOBI or HTML make take some time. Once the conversion is finished you will find the book in the same folder as the original book.

Calibre eBook Management is much more than just a converter it’s a free and open source e-book library management application developed by users of e-books for users of e-books. It has a cornucopia of features divided into the following main categories:

  • Library Management
  • E-book conversion
  • Syncing to e-book reader devices
  • Downloading news from the web and converting it into e-book form
  • Comprehensive e-book viewer
  • Content server for online access to your book collection

Check it out:

Based On:

Wednesday, May 2, 2012

Mount a VMware a Virtual Disk in Windows

How to Mount a VMware Virtual Disk in Windows

Here is handy tool that is part of VMware Workstation, but isnt as well know as some features but can be a real timesaver!

Let’s say your working on a Virtual Machine however it is turned off but you quickly need to pull an important file from it to use or check something you would normally have to go through the process of booting the whole VM to get to the file which may not be desirable if it takes a while to boot the VM, or you dont have the spare RAM (maybe you already have another VM or two running).

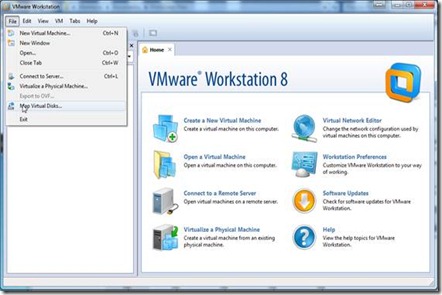
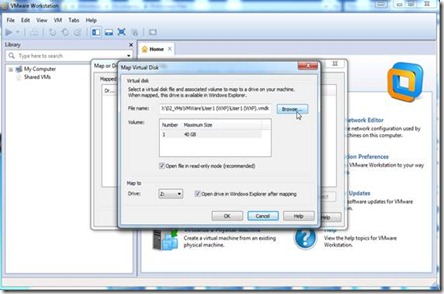
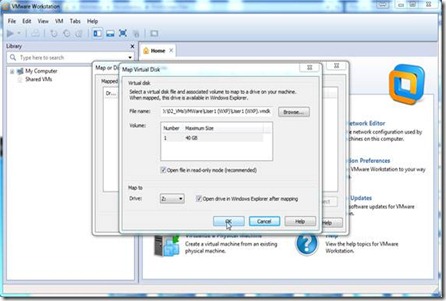
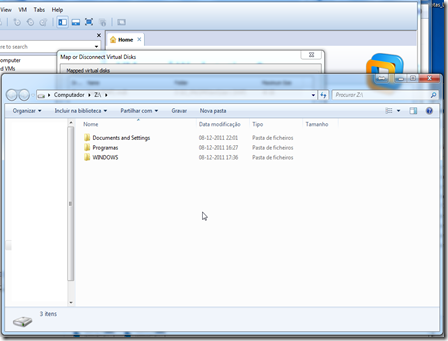
Thankfully, VMware can save you some hassle as it includes a tool to map VMware virtual hard disks directly to to the host computer without needing to boot a Virtual Machine at all. To use this tool simply go to File > Map or Disconnect Virtual Disks and click on the Map option, then point it to the .vmdk virtual disk file and select the drive letter to map it to. When you click Ok the drive will load which can take a few seconds and then you will have the disk available to use.

clip_image002

clip_image004

clip_image006

clip_image008

ScreenShot036

There are however a couple of important limitations to note:

· You can only mount partitions that are formatted FAT or NTFS (on Windows anyway), any non-FAT or NTFS partitions that exist in a Virtual Disk won’t be mounted.

· You can’t mount a Virtual Disk that is compressed, encrypted or set to have read-only permissions.

· To run the Virtual Machine that uses a mounted Virtual Disk, you must first disconnect the disk via the Map or Disconnect Virtual Disks menu.

Finally, here is a final warning that I have taken from the VMware Manual that is worth reading if you make use of snapshots (either linked or un-linked ones):

Caution VMware recommends that you leave the check box “Open file in read-only mode” selected in the Map a Virtual Disk dialog box. This setting prevents you from accidentally writing data to a virtual disk that might be the parent of a snapshot or linked clone. Writing to such a disk might make the snapshot or clone unusable.

Based on: http://www.monkeydust.net/2010/02/24/how-to-mount-a-vmware-virtual-disk-in-windows/

Monday, April 30, 2012

Homemade “Find My iPhone” for Android – Free

iPhone users can pay $99 per year for a tool to find their lost iPhone. On Android, just under $6.50 (once) lets you build your own GPS-locating, SMS-triggered tracker for your lost-or-stolen Precious. Here's how to do it.

After installing a program and setting up a script, you'll be able to set your phone to watch for an SMS, from a certain number, containing a certain piece of text. When it finds it, you can have your phone buzz, make a sound, even say something like "Help!" out loud, and pop up a text on the screen indicating that something is amiss. That's the warning shot, for those do-gooders who actually return phones. In any case, your phone quietly turns on its GPS and Wi-Fi sensors in the background, then sends you back a text with the best GPS data it could get. You can modify this script to your heart's content, though, to be more obnoxious, send back more info, or run other programs when you send your code.

Check out the video above for a low-rent crime thriller that shows this system in action.

As some regular readers might have guessed, the secret sauce to building this app is Tasker. It's an automation app for Android that costs about $6.25 U.S. at the moment, available both through the Market and the developer's own site. We've previously walked through the basics, explored geekier setups, and highlighted some awesome reader uses. Now we're going to walk through one of the most useful Tasker profiles we've seen, the root setup for which came from Lifehacker reader Eric.

Set Up a Location-Grabbing Profile
clip_image002

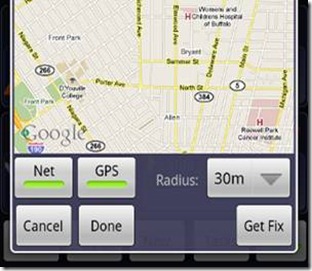
Your Android phone does not constantly check its location when GPS is turned on—it'd be kind of scary if it did, not to mention battery murdering. We're going to create a profile that does make the phone grab its coordinates as best it can, using both a GPS fix, if available, and triangulation of nearby Wi-Fi hotspots that Google knows about.

On Tasker's main "Profiles" screen, hit the New button at bottom. Choose the "Location" as your Context—the "if" in your "if/then" automation. Make sure that both Net and GPS are turned on with green highlights, and that the Radius option is set to its closest option, 30 meters. Just hit "Done" here, because we don't actually need to make Tasker find our current location, but simply have a profile that does that when asked to. You'll see what we mean in a minute.
clip_image004

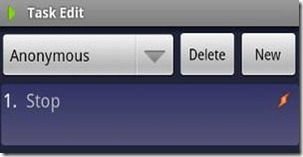
On the next screen, where you're asked to add Tasks to fire off when your Context is met, we're going to add just one simple task. Hit the "+" button in the lower-left, choose the "Tasker" category, then select "Stop" and hit "Done" on the pop-up screen, then "Done" again on the list of Tasks. All we want this profile to do is turn on and get the location. Adding "Stop" merely makes it a one-trick pony.
clip_image006

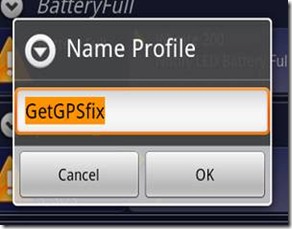
Back at the main screen, find that location-fixing Profile you've just created, with the flag icon in the left-hand column. Tap once on that flag icon, then expand the arrow next to the "Profile" option. Select the "Name" or "Rename" option, and give it a name that makes sense, like "GetGPSfix." You're done with that profile now, so let's create the real phone-finding automaton.

Build Your Phone-Finding Snitch Profile
clip_image008

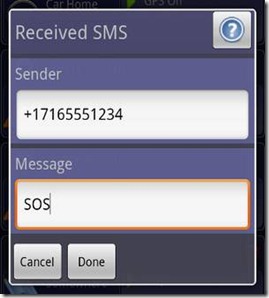
Back at Tasker's main Profiles screen, hit the New button again, but this time choose "Event" as your context, pick the "Phone" category, and "Received SMS" as your event.

You'll want to think about the number and message you enter in here. In my case, I use a Google Voice account to manage my SMS, so I effectively have two numbers—the "hard" number that my phone carrier assigns me, and which Tasker is monitoring on the phone, and my Google Voice number, which I can send texts from using any browser. If you're not rolling with Google Voice, you can easily set up the phone of a significant other or very good friend—just make the activation text very unique.

Be sure to format the phone number watched for with a "+1" in front of your full 10-digit number—that's how it works in the U.S., at least. If you're setting up another person's phone as the trigger number, you can press and hold on the field under "Sender" and select that person from your Contacts list, too. In the "Message" field, use a code that nobody's going to send you casually—"SOS" in caps should work fine.
clip_image010
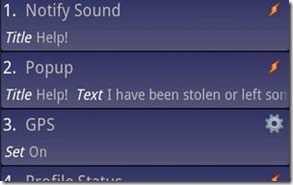
At the Tasks list, it's time for you to set up your actual emergency plan. In general, you're going to create some noise on the phone itself and leave a call-back number (your friend or your Google Voice account), then turn on GPS and Wi-Fi and text yourself with the inside info anyways.

Here's how I set up my list of tasks—the order is somewhat important, but you can add or modify these steps to your liking. If you come up with something good farther down the line, no worries: you can press and hold on any task and drag it up or down the priority list.

Hit the "+" button before each task to create it, then follow these menu options:

§ Alert -> Notify Sound: The "Title" field will show up in your Notifications Bar, along with the "Text" you include. Don't change "Number," but feel free to fire off a custom sound file, if you'd like.
 clip_image012

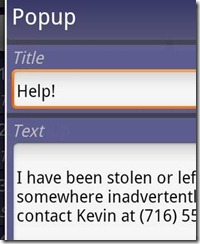
Alert -> Popup: Enter something like "Help!" in the Title, then fill out the Text as if it were a Post-It note on your phone. My text, derived from Eric's suggestion: "I have been stolen or left somewhere inadvertently. Please contact Kevin at [friend's phone number]." Move the Time slider all the way to the right, to keep that pop-up message for 38 seconds—though, if he was savvy with an Android, the thief or finder could hit the Back or Home buttons to dismiss it. But that's okay, because we're moving ahead!

  • Misc GPS: Set to "On."
  • Net -> WiFi: Set to "On."
  • Tasker -> Profile Status: Long-press on the field under Name, then pick that profile we created above to get the location fix—"GetGPSfix" in my case. Set it to go "On."
  • Tasker -> Wait: Move the Seconds slider over to about 30. We're waiting 30 seconds, after turning on GPS and WiFi, to give the location grabber some time to get a fix, or maybe the thief or reluctant returner to move near a window.
 clip_image014
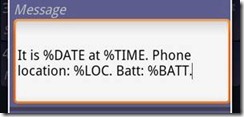
Phone -> Send SMS: Enter your Google Voice or friends' number in the Number field, then enter this text in the Message. You can change it up, add more variable data, but be sure to include at least the following variables in all caps with a percentage sign in front:

It is %DATE at %TIME. Phone is located at: %LOC. Batt: %BATT.

You'll get back just what it sounds like, but the "%LOC" comes back as a pretty long string of GPS coordinates, so you'll want to keep it relatively simple so as not to break the string into two different texts.

  • Misc -> GPS: Set to Off.

You could have the WiFi turn off at the end, too, or bring up another pop-up message letting the thief know that his location is being constantly monitored—but I like to go the quiet route, rather than have my phone end up smashed or discarded.

Track Your Phone

clip_image016
Click image above for a larger view.

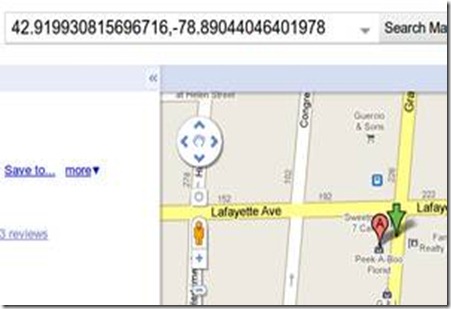
With that profile running on Tasker, your phone is now quietly monitoring incoming SMS messages to see if any come from that one number, with that one message. If it does, it sends back a text similar to what you see above. The nice thing about those GPS coordinates? You can plug them directly into Google Maps and see where your phone went off to—or help the police see.
clip_image018
I took my phone to the Sweet_ness 7 Cafe in Buffalo, placed it on a table a few feet away from a window, and sent myself a text from Google Voice. Lo and behold, the GPS coordinates it sent back were right on the money—even if Street View hadn't been updated there since the cafe renovated the space. Your mileage, vis-a-vis the thief's activities, will certainly vary, but since you're the one with control over your GPS and Wi-Fi toggles, there's a good chance your phone will eventually end up in the great wide open. And if you simply left your phone sitting somewhere, you can get a rough fix on where it is, and see how much battery life it's got left before you'll have to stop trying.


Thanks again to reader Eric for writing in with his awesome use of Tasker, along with a helpful poster in the Android Forums who explained the best way to get a GPS fix in Tasker with separate profiles.

Got questions on the setup? Have a craftier idea for a lost or stolen phone script? We want to hear it all in the comments.

Takem From:  http://lifehacker.com/5611003/build-a-find-my-iphone-clone-for-android

On the Android Market, if you search by “Find My Phone”, you can find apps that do this by default.