Wednesday, September 2, 2009

NIC Auto-Negotiation and Duplex Settings - NIC satus

FAQ: How to change Duplex and/or Auto-Negotiation NIC settings in Linux?

Q: How to disable auto-negotiation option of my network interface card and set up half/full duplex mode manually from Linux command line (CLI)? By the way, how to see current settings?
A: There are several Linux utilities coming with almost any distribution including Debian, Ubuntu, Fedora, RedHat, Mandriva, Centos whatever. See details below.

auto-nego

ethtool

This is rather powerful utility can display and change settings of ethernet network interface card. You can easily disable/enable autonegotiation option for your NIC, also it’s possible to manually set up duplex mode, configure wake-on-lan options, set speed settings. Just look through full manual page for ethtool. Here are several ethtool usage examples:

ethtool eth0 - shows current NIC settings

Settings for eth0:
Supported ports: [ TP MII ]
Supported link modes: 10baseT/Half 10baseT/Full
100baseT/Half 100baseT/Full
Supports auto-negotiation: Yes
Advertised link modes: 10baseT/Half 10baseT/Full
100baseT/Half 100baseT/Full
Advertised auto-negotiation: No
Speed: 10Mb/s
Duplex: Half
Port: MII
PHYAD: 32
Transceiver: internal
Auto-negotiation: off
Supports Wake-on: pumbg
Wake-on: d
Current message level: 0x00000007 (7)
Link detected: yes

ethtool -s eth0 duplex half autoneg off - disables auto-negotiation, enables Half Duplex.
ethtool -s eth1 duplex full speed 1000 autoneg off - disables auto-negotiation, enables Falf Duplex and sets up Speed to 1000 Mb/s.

mii-tool

According to manual it allows to manipulate and see media-independent interface status. Let’s see examples:

bash-3.1# mii-tool eth0
eth0: negotiated 100baseTx-FD, link ok
- shows 100 Mbps speed, Full Duplex, Auto-negotiation is on.
bash-3.1# mii-tool eth0 -F 10baseT-HD - enables 10 Mb/s Half Duplex connection.


Taken From: http://www.linuxscrew.com/2008/11/20/faq-how-to-change-duplex-andor-auto-negotiation-nic-settings-in-linux/

Tuesday, July 7, 2009

Setting up a dial-up VPN on the Juniper NetScreen Remote (client)

Note: I tried the tutorial on a Juniper SSG350M, with FW 6.0.0r4.0, and it worked althoug it's not the equipement on the tutorial


Note: To see the pictures at full quality just click on them.


This article was graciously contributed by mwdmeyer which was originally posted on his site here.

I've been getting lots of hits to the post about a site to site VPN setup with a netscreen. So I've decided to do one for a dial-up VPN user connecting to a netscreen.

A dial-up user is anyone who needs access into the network and has a dynamic ip address. We don't wish to be able to access them (the dial-up user) from within the network. This is how we setup most connections at work. This allows people to access file shares and outlook (without the need to setup RPC over HTTP).

Background

  • Netscreen 5GT running ScreenOS 5.4.0r1 (Should be the same process for any netscreen running ScreenOS 5.x)
  • Netscreen Remote 8.7 (The Windows VPN client)
  • Local Network (the one in which the vpn users want to access) of 10.0.0.0/22 (10.0.0.0 - 10.0.3.255)
  • External Address of 59.167.253.89

Setting up the Netscreen

1) First we need to create a user. This can be found in Objects -> Users -> Local (Note: Follow the screen shot below, you don't need a password here, you do need the IKE User info though)


So we have our user, Test.User

2) Create Phase 1 of the VPN tunnel. This can be found in VPNs -> AutoKey Advanced -> Gateway (Note: Security level is set to custom, password for VPN is entered here, Outgoing interface is your untrust interface).


3) Now we'll modify the advanced settings. Click Advanced (Note: We're using DES and MD5 here. Mode is set to Aggressive)


Now click return and okay to save your settings.

4) Now we'll create the Phase 2 information. This can be found in VPNs -> AutoKey IKE (Note: Security level is set to custom, Remote Gateway is set to "Test.UserP1")


5) Now we'll modify the advanced settings. Click Advanced (Note: We're using DES and MD5 here. Replay Protection is on)


Now click return and okay to save your settings.

6) Now we'll need to create a policy. This will go from untrust to trust. This can be found in Policies.


Click new (Note: Source Address is Any-IPv4 or just Any if IPv6 is disabled, Destination Address is your local subnet, tunnel the connection though the VPN user "Test.UserP2")


Now the Netscreen has been setup.

Setting up Netscreen Remote

1) Open the policy editor in Netscreen Remote

NetScreen Remote 1

2) Create a new connection (Note: Type in the remote subnet details and set the secure gateway to your netscreens external address)


3) Now we'll setup the login details (Note: The Certificate is None, The ID Type is Domain Name and the value is "Test.User")


4) Now click Pre-Shared Key (Note: Type in the password you used when setting up the connection in the netscreen)


5) Now we'll set the connection to aggressive (Note: Enable PFS, DH is Group 2 and Enable Replay Dection)


6) Now we'll setup the Phase 1 details (Note: We're using DES and MD5 here. SA Life is 28800 seconds)


7) Now we'll setup the Phase 2 details (Note: The SA Life here is 3600 Seconds)


8) Save the settings and Test!

That should be all you need to do.

Notes

  • The VPN may not work behind some NAT routers. You can try turning on NAT-T within the netscreen, although I find it doesn't normally work.
  • Make sure the details in the Netscreen and Netscreen Remote Match (i.e Phase 1 policies etc)
  • You can check the logs from both Netscreen and Netscreen Remote
  • You cannot connect to the VPN while within the local subnet
  • Netscreen Remote should be disabled when you're directly connected to the network
  • Only traffic for the subnet is passed over the VPN.


Taken From:
http://www.juniperforum.com/index.php?page=20
Added minor correction in te policy source that has to be "Dial Up"

Friday, June 12, 2009

Save, Guess and Restore the Master Boot Record (MBR)

The Master Boot Record is an amazing little section of disk that you almost never notice—until it's gone. When that happens, read below to find out how to bring it back.

The following is a continuation of a series of columns on Linux disasters and how to recover from them, inspired in part by a Halloween Linux Journal Live episode titled “Horror Stories”. You can watch the original episode at www.linuxjournal.com/video/linux-journal-live-horror-stories.

I have to admit, I've learned more about how Linux works by breaking it and fixing it, than I have by any other method. There really is nothing quite like the prospect of losing valuable data, or the idea that your only computer won't boot, to motivate you to learn more about your system. In this month's installment of “When Disaster Strikes”, I discuss a surprisingly small part of your computer that plays a surprisingly large role in booting and using it—the Master Boot Record, or MBR for short. I cover some of my favorite ways to destroy an MBR and a few ways to restore it once you have.

Before you can fully understand how to restore the MBR, you should have a good idea of what it actually is. The MBR comprises the first 512 bytes of a hard drive. Now that's bytes, not megabytes or even kilobytes. In our terabyte age, it's hard to appreciate how very small that is, but to give you an idea, at this point in the column, I've already written about three MBRs worth of text.

This 512-byte space then is split up into two smaller sections. The first 446 bytes of the MBR contain the boot code—code like the first stage of GRUB that allows you to load an operating system. The final 66 bytes contain a 64-byte partition table and a 2-byte signature at the very end. That partition table is full of information about the primary and extended partitions on a disk, such as at which cylinder they start, at which cylinder they end, what type of partition they are and other useful data you typically don't think much about after a disk is set up—at least, until it's gone.

A Routine Lecture on Backups

This is the part of the column where I repeat some of the best disaster recovery advice I know—make backups. In this case, we are talking about MBR disasters, so here are a few ways to back up your MBR. After all, it's only 512 bytes; there's no reason why you can't afford to back it up. Heck, it's small enough to tattoo on your arm, except I guarantee once you do you'll end up migrating to a new system or changing the partition layout.

The best tool to back up the MBR is coincidentally the best tool at destroying it (more on that later), dd. In fact, dd is one of those ancient, powerful and blunt UNIX tools that blindly does whatever you tell it to, and it's adept at destroying all sorts of valuable data (more precisely, it's adept at following your explicit orders to destroy your valuable data). The following command backs up the MBR on the /dev/sda disk to a file named mbr_backup:

$ sudo dd if=/dev/sda of=mbr_backup bs=512 count=1

Basically, this tells dd to read from /dev/sda 512 bytes at a time and output the result into mbr_backup, but to do only one 512-byte read. Now you can copy mbr_backup to another system or print it out and do the tattoo thing I mentioned before. Later on, if you were to wipe out your MBR, you could restore it (likely from some sort of rescue disk) with a slight twist on the above command. Simply swap the input and output sources:

$ sudo dd if=mbr_backup of=/dev/sda bs=512 count=1
More than One Way to Skin an MBR

There are a number of elaborate ways you can destroy some or all of your MBR. Please be careful with this first command. It actually deletes your MBR at the very least, and with a typo, it potentially could delete the entire disk, so step lightly. Let's start with the most blunt, dd:

$ sudo dd if=/dev/zero of=/dev/sda bs=512 count=1

This command basically blanks out your MBR by overwriting it with zeros. Now, unless you are masochistic, or you are like me and used this in a demonstration of MBR recovery tools, you probably wouldn't ever run this command. Most people end up destroying part of their MBR in one of two ways: mistakes with bootloaders and mistakes with fdisk or other partitioning tools.

Mistakes with partitioning tools probably are the most common way people break their MBRs, or more specifically, their partition tables. It could be that you ran fdisk on sda when you meant to run it on sdb. It could be that you just made a mistake when resizing a partition, and after a reboot, it wouldn't mount. The important thing to keep in mind is that when you use partitioning tools, they typically update only the partition table on the drive. Even if you resize a drive, unless you tell a partitioning tool to reformat the drive with a fresh filesystem, the actual data on the drive doesn't change. All that has changed are those 64 bytes at the beginning of the drive that say where the partitions begin and end. So, if you make a partitioning mistake, your data is fine. You just have to reconstruct that partition table.

It would figure that the first time I really destroyed my MBR, it was through the second, less-common way—mistakes with bootloaders. In my case, it was a number of years ago, and I was struggling to get an early version of GRUB installed on a disk. After the standard command-line commands didn't work, I had the bright idea that maybe I could use the GRUB boot floppy image. After all, it was 512 bytes and so was my MBR, right? Well, it sort of worked. GRUB did appear; however, what I didn't realize was that in addition to writing GRUB over the first 446 bytes of my MBR, I also wrote over the last 66 bytes, my partition table. So although GRUB worked, it didn't see any partitions on the drive.

Guessing Games Fix a Partition Table

I had at least used Linux long enough that after I made my mistake, I realized my actual data was still there and that there must be some way to restore the partition table. This was when I first came across the wonderful tool called gpart.

gpart is short for Guess Partition, and that is exactly what it does. When you run the gpart command, it scans through a disk looking for signs of partitions. If it finds what appears to be the beginning of a Windows FAT32 partition, for instance, it jots it down and continues until eventually it sees what appears to be the end. Once the tool has scanned the entire drive, it outputs its results to the screen for you to check and edit. It also optionally can write this reconstructed partition table back to the disk.

gpart has been around for quite some time and is packaged by all of the major distributions, so you should be able to install it with your standard package manager. Don't confuse it with gparted, which is a graphical partitioning tool. Of course, if your main system is the one with the problem, you need to find a rescue disk that has it. Knoppix and a number of other rescue-focused disks all include gpart out of the box.

To use gpart, run it with root privileges and give it the disk device to scan as an argument. Here's gpart's output from a scan of my laptop's drive:

greenfly@minimus:~$ sudo gpart /dev/sda

Begin scan...
Possible partition(Linux ext2), size(9773mb), offset(0mb)
Possible partition(Linux swap), size(980mb), offset(9773mb)
Possible partition(SGI XFS filesystem), size(20463mb), offset(10754mb)
End scan.

Checking partitions...
Partition(Linux ext2 filesystem): primary
Partition(Linux swap or Solaris/x86): primary
Partition(Linux ext2 filesystem): primary
Ok.
Guessed primary partition table:
Primary partition(1)
type: 131(0x83)(Linux ext2 filesystem)
size: 9773mb #s(20016920) s(63-20016982)
chs: (0/1/1)-(1023/254/63)d (0/1/1)-(1245/254/56)r

Primary partition(2)
type: 130(0x82)(Linux swap or Solaris/x86)
size: 980mb #s(2008120) s(20016990-22025109)
chs: (1023/254/63)-(1023/254/63)d (1246/0/1)-(1370/254/58)r

Primary partition(3)
type: 131(0x83)(Linux ext2 filesystem)
size: 20463mb #s(41909120) s(22025115-63934234)
chs: (1023/254/63)-(1023/254/63)d (1371/0/1)-(3979/184/8)r

Primary partition(4)
type: 000(0x00)(unused)
size: 0mb #s(0) s(0-0)
chs: (0/0/0)-(0/0/0)d (0/0/0)-(0/0/0)r

To hammer home the point about how easy it is to back up the MBR, now I have an extra backup of my laptop partition table—in this magazine.

As you can see, it correctly identified the two primary partitions (/ and /home) and the swap partition on my laptop and noted that the fourth primary partition was unused. Now, after reviewing this, if I decided that I wanted gpart to write its data to the drive, I would run:

$ sudo gpart -W /dev/sda /dev/sda

That isn't a typo; the -W argument tells gpart to which disk to write the partition table, but you still need to tell it which drive to scan. gpart potentially could scan one drive and write the partition table to another. Once you specify the -W option, gpart gives you some warnings to accept, but it also prompts you to edit the results from within gpart itself. Personally, I've always found it a bit more difficult to do it that way than it needs to be, so I skip the editor, have it write to the disk, and then use a tool like fdisk or cfdisk to examine the drive afterward and make tweaks if necessary.

gpart Limitations

gpart is a great tool and has saved me a number of times, but it does have some limitations. For one, although gpart works very well with primary partitions, it is much more difficult for it to locate extended partitions, depending on which tool actually created them. Second, take gpart results with a grain of salt. It does its best to reconstruct drives, but you always should give its results a sanity check. For instance, I've seen where it has identified the end of a partition one or two megabytes short from the actual end. Typically, when we partition drives, we put one partition immediately after another, so these sorts of errors are pretty easy to find.

Reload the Boot Code

Now, if you have destroyed only the partition table, you hopefully should be restored at this point. If you managed to destroy the boot code as well, you need to restore it too. These days, most Linux distributions use GRUB, so with your restored partition table, if you are currently booted into the affected system, run:

$ sudo grub-install --recheck /dev/sda

Replace /dev/sda with the path to your primary boot device. If you use an Ubuntu system, you optionally could use the update-grub tool instead. If you are currently booted in to a rescue disk, you first need to mount your root partition at, say, /mnt/sda1, and then use chroot to run grub-install within it:

$ sudo mkdir /mnt/sda1
$ sudo mount /dev/sda1 /mnt/sda1
$ sudo chroot /mnt/sda1 /usr/sbin/grub-install
↪--recheck /dev/sda

If the chrooted grub-install doesn't work, you typically can use your rescue disk's grub-install with the --root-directory option:

$ sudo /usr/sbin/grub-install --recheck
↪--root-directory /mnt/sda1 /dev/sda

Well hopefully, if you didn't have a profound respect for those 512 bytes at the beginning of your hard drive, you do now. The MBR is like many things in life that you don't miss until they are gone, but at least in this case, when it's gone, you might be able to bring it back.

Kyle Rankin is a Senior Systems Administrator in the San Francisco Bay Area and the author of a number of books, including Knoppix Hacks and Ubuntu Hacks for O'Reilly Media. He is currently the president of the North Bay Linux Users' Group.


Taken From: Linux Journal Contents #180, April 2009

http://www.linuxjournal.com/article/10385

Backup Files With Rsync and Grsync

There are, of course, numerous backup solutions you can use, from the simple and free to the complex and expensive, as well as everything in between. The technology behind most backup systems, however, tends to be much more limited. Using classic tools, such as tar and gzip, to back up and compress is still very common under the surface of much more complex tools. This is true even when using network resources. In the end, you are backing up from one machine to another. Many people I know, including those with small businesses, do this for their regular backups. Machine A backs to machine B, which backs to C, which backs to A. The machines, and their drives, are all part of a network. Hey, instant cloud, and you probably didn't know you had one.

This is where rsync, another popular backup tool, shows its worth. As the name implies, rsyncs keep a backup copy of your data, in sync with the original. It can do it locally, from one physical drive to another, or across your network. Because only those files that have been modified are transferred, the process can be very quick. You can do this with single files, whole directories and subdirectories, while maintaining file ownership and permissions, links, symbolic links and so on. rsync has its own transport, or you can use OpenSSH to secure the transfer, and (of course) there are some great front-end, graphical tools to make the process a little slicker.

You can find rsync at rsync.samba.org, but you probably don't even have to look that far. Many distributions load it when you install your system. If not, check your installation disks or simply pick it up from your distribution's repositories. Before I explain how to rsync your data to your own personal cloud, let me show you how easy it is to create a synchronized backup of your data from one directory to another (or one drive to another):

rsync -av important_stuff/ is_backup

In the above example, rsync copies everything in the directory important_stuff into another directory (or folder) called is_backup. Most of you will have figured out that the -v means verbose copy. The -a option hides some amount of complexity in that it is the same as using the -rlptgoD flags. In order, this means that rsync should do a recursive copy; copy symbolic links; preserve permissions, modification times and group and owner information; and, with the final D, copy special files (device and block). When you press Enter, files go scrolling by, after which you see something like this:

sending incremental file list
./
CookingJul08.tgz
CookingJul2008_albums.odt
CookingJul2008_albums.txt
igal_page.png
montage.png
shalbum.png
zenphoto_comment.png
zenphoto_go.png
zenphoto_login.png
zenphoto_makepass.png
zenphoto_setup.png
zenphoto_theming_comment.png
zenphoto_upload_photos.png
zenphoto_view_album.png
. . . .

sent 46059880 bytes received 2753 bytes 6141684.40 bytes/sec
total size is 46044132 speedup is 1.00

One other thing that rsync should be able to do in order to be completely useful is delete files. If you are mirroring files and directories, it stands to reason that you want the mirror to represent exactly what is on the original. If files have been deleted, you want them deleted on the backup server as well. This is where the --delete parameter comes into play. Using the earlier example, let's delete that tgz file from the original, then relaunch the command:

$ rsync -av --delete important_stuff/ is_backup
sending incremental file list
./
deleting CookingJul08.tgz

sent 4164 bytes received 25 bytes 8378.00 bytes/sec
total size is 41911050 speedup is 10005.03

From here on, both directories will always be in sync. When doing network backups, this magic synchronization of files and directories is done using a client and server setup. At least one machine must play the role of server (although nothing is stopping you from running an rsync dæmon on every one of your machines). The server gets its information about who can access what from a configuration file called rsyncd.conf. You'll find that it probably lives in the /etc directory. The following partial listing is from one of my rsync servers:

hosts allow = 192.168.1.0/24
use chroot = no
max connections = 10
log file = /var/log/rsyncd.log
gid = nogroup
uid = nobody

[marcel]
path = /media/bigdrive/backups/marcel
read only = no
comment = Marcel's files
[francois]
path = /media/bigdrive/backups/francois
read only = no
comment = Files for the waiter

This configuration file is quite simple once you get the hang of it. Backup areas are identified by a name in square brackets (marcel, website, francois and so on). The chief bits of information there include the path to the disk area and some kind of comment. Notice that I specified read only = no, but I could just as easily have added that to the top section (the one without a name in square brackets). That's the global section. Anything put up there applies to all other sections, but it can be overridden. Pay particular attention to the gid and uid values; these are the group ID and user ID to which the file transfer takes place. The default is nobody, but you need to make sure that is correct for your system. One of my servers does not have a nobody group, but has a nogroup group instead.

The hosts allow section identifies my local subnet as being the only set of addresses from which transfers can take place. The log file line identifies a file to log information from the dæmon. You also can specify a maximum number of connections, specific users who are allowed to transfer files (auth users) and a whole lot more. Run man rsyncd.conf for the full details. When your configuration is set, you can launch the rsync dæmon, which, interestingly enough, is exactly the same program as the rsync command itself. Just do the following:

rsync --daemon

That's it. Now, it's time to put this setup to use. You might want to test your rsync connection by issuing the command:

rsync remote_host::

Note the double colon at the end of the server's name. The result should be something like this, assuming a server called thevault:

$ rsync thevault::
website All our websites
francois Files for the waiter
marcel Backup area for Marcel

Now, pretend I am on the server where my Web site files live. Using the following command, I can launch rsync to back up this entire area:

rsync -av /var/www thevault::website/

building file list ...

The format of the rsync command is rsync options source destination, which means I also could start the command from thevault, assuming my Web site machine also was running an rsync dæmon. The result would look more like this:

rsync -av localbackupdir websitemachine.dom::websites

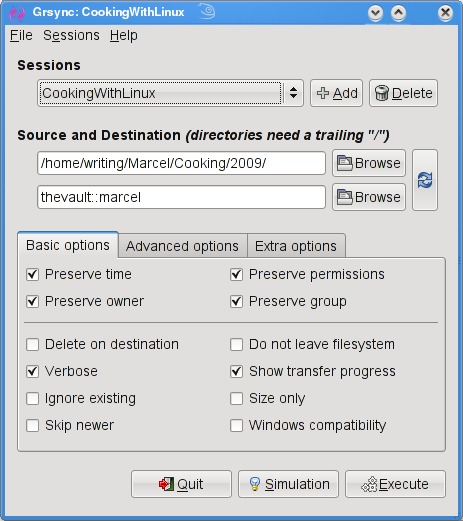
All this work at the command line is great, but there are some tools for making the process easier, particularly if you will be creating a number of rsync backups or if you want to get into more complex requirements, such as scheduled backups. A friendly graphical front end on your desktop also may be a greater incentive to perform regular backups or take a quick backup when you've added important data and a “right now” backup is desirable. The first tool I want to show you is Piero Orsoni's grsync (Figure 1).

Figure 1. grsync provides an easy-to-use interface with every rsync option you could want.

While providing a great front end to rsync, grsync also works as a teaching tool for the command-line version of the program, or at least it helps as a memory aid. Almost any command-line option available to rsync is covered in one of these three tabs: Basic options, Advanced options and Extra options. What makes it a learning tool is that if you pause over any of those check boxes with your mouse, a tooltip appears showing the command-line option with a brief description of its function.

To start, click the Add button next to the session drop-down dialog and enter a name for your backup. You can define many different rsync backups here, and then launch them again at a later time. Clicking the Browse button brings up the standard Gtk2 file browser window from which you can select your local and destination folders. Unfortunately, you can't browse remote systems, but if you've already set up an rsync server, have no fear. You can enter it manually in the format I showed you earlier (for example, thevault::marcel/). When you are happy with the various options, click Execute. If you only think you are happy, click the Simulation button. (Chef Marcel loves a program with a sense of humor.) When you do click Execute, the program switches to a progress window (Figure 2), so you can see where you are in the process.

Figure 2. Once your grsync backup begins, it switches to a progress report view.

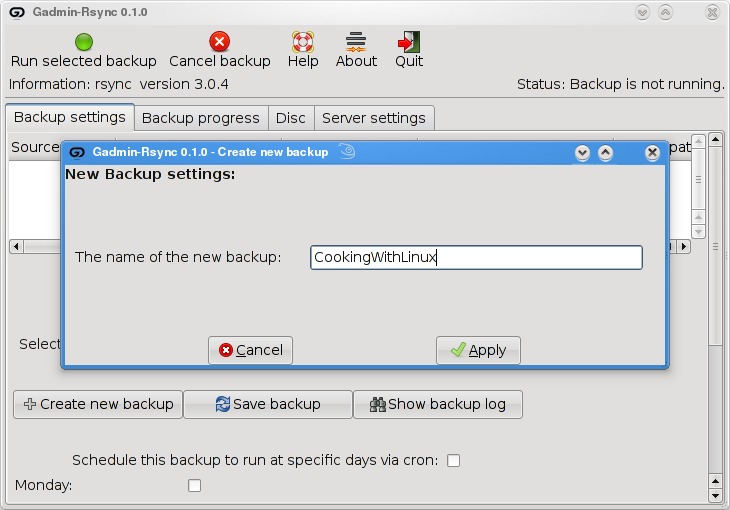
The next item on our rsync menu is Magnus Loef's GAdmin-Rsync. GAdmin-Rsync makes every aspect of creating an rsync backup a matter of filling in the blanks. What's more, the program creates backups using SSH by default, which means you can set up rsync backups to any machine to which you have secure shell access. This also means you don't actually need to have an rsync dæmon running on the remote machine if you have SSH access. Let me show you how it works.

When you start the program for the first time, you'll be asked for a name to give your new backup (Figure 3). You could back up the entire system or select specific folders of filesystems. Choose a name that makes sense to you based on what you want to back up. Enter a name, then click Apply to continue.

Figure 3. GAdmin-Rsync lets you define numerous backup configurations, each with its own identifier.

As you saw when we did this at the command line, rsync backups can be local, to a remote system or from a remote system. The next window looks for that very information (Figure 4). By default, local backup is checked. To back up to a remote server, select Local to remote backup. Because you can swap source and destination easily when using rsync, there's that third option. I routinely use a remote to local backup for my Web sites and remote systems. Click Forward to continue.

Figure 4. Your next step is to define the location of the backup.

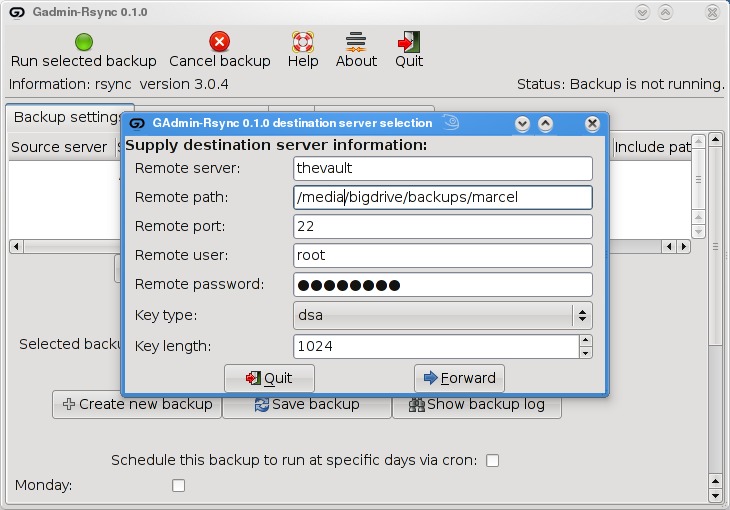
Assuming you chose to back up to your cloud, your next step is to enter the server information (Figure 5). This includes the backup path on your networked server as well as your SSH key type and length. When you have entered this information, click Forward.

Figure 5. For remote backups, GAdmin-Rsync uses SSH/SCP for secure transfers.

Now you're ready to start the rsync backup. Click the Backup Progress tab to watch all the action.

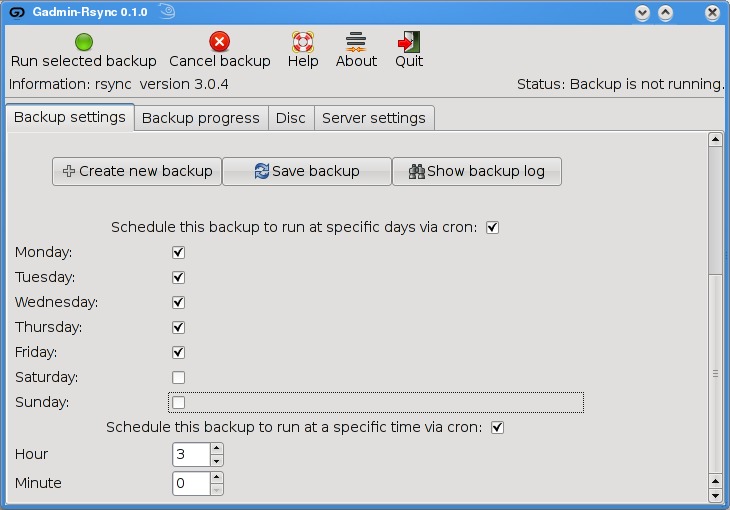
What is nice about this program is that you can (as with grsync) store a number of backup definitions, so you can choose to back up your documents, music or digital photographs when it suits you. GAdmin-Rsync goes further though. If you take a look down at the bottom of the window on the Backup settings tab, you'll notice the words “Schedule this backup to run at specific days via cron” and a check box (Figure 6). Check the box, then scroll down to choose the days you want the backup to run. A little further down, you can specify the time as well.

Figure 6. GAdmin-Rsync also provides an easy way to schedule your backups with cron.

Well, mes amis, closing time has caught up to us, and at least for now, time is one thing we can't back up. Despite the hour, I am quite sure we can convince François to refill our glasses one final time before we go our separate ways. Please, mes amis, raise your glasses and let us all drink to one another's health. A votre santé! Bon appétit!

Marcel Gagné is an award-winning writer living in Waterloo, Ontario. He is the author of the Moving to Linux series of books from Addison-Wesley. Marcel is also a pilot, a past Top-40 disc jockey, writes science fiction and fantasy, and folds a mean Origami T-Rex. He can be reached via e-mail at marcel@marcelgagne.com. You can discover lots of other things (including great Wine links) from his Web sites at www.marcelgagne.com and www.cookingwithlinux.com.


Taken From: Linux Journal Contents #180, April 2009

http://www.linuxjournal.com/article/10409

Wednesday, June 10, 2009

Booting ISOs From a USB Flash Drive With Grub4Dos

Introduction
Section 1 - Installing Grub4DOS
Section 2 - Setup Booting an ISO File (Acronis ISO)
Additional Notes


Introduction

Grub4DOS is a boot manager that can be easily installed to a flashdrive or hard drive. It allows booting multiple operating systems directly as well as booting into bootable partitions.

For the purpose of this guide, Grub4DOS will be used to setup a flashdrive to boot the Acronis Resuce Media. This can be done by booting to the partition on the flashdrive (as setup by the Acronis Media Builder program) or by directly booting the Acronis ISO file. When you use the ISO method, you can put as many Acronis ISO images as required on the same flashdrive. This allows you to easily be able to boot into True Image Home 9, 10, 11, 2009, Echo Workstation, etc. by just selecting the desired menu entry.

Tip: It is highly recommended that you read through the entire instructions before you begin this procedure.
Note: Either of these methods work equally well on USB hard drives or internal drives too as long as another boot manager (such as BootIt NG) is not installed on the drive

While it is always recommended to have backups of any important data before making any changes to your drives, installing Grub4DOS is not a destructive procedure. Existing partitions and data on the flashdrive should not be erased or corrupted in any way.


Section 1 - Installing Grub4DOS

Before Grub4DOS can be installed, several files need to be downloaded and unzipped. One is the Grub4DOS program and the other is the Installer. Click on the links below to download the files. Save them to a known location (My Downloads, for example) so they're easy to find.


Tip: For those interested, more information on Grub4Dos can be found at the following locations:
Grub4Dos Main Page
Grub4Dos Tutorial
Grub4Dos Guide (hosted by boot-land.net)
Grub4Dos GUI Installer Downloads


Extract the downloaded zip files into separate folders. For example, you may unzip Grub4DOS to C:\Grub4DOS and the Installer to C:\Grub4DOS-Installer. You may also choose to unzip them into a folder named after the zip file's name.

If your flashdrive is not already plugged into the computer, plug it in now.

The next step is to run the Grub4DOS Installer on the flashdrive. Browse to the Installer's unzipped folder using Windows Explorer.


In Windows XP, just run the grubinst_gui.exe program.

In Vista, you'll need to run grubinst_gui.exe in Administrator mode. Right-click on the program file and select Run as administrator from the pop-up menu.


You may get a security pop-up window asking if you want to run the program. Select Run to start the program.


In Vista, if you have UAC turned on (the default setting), you'll get another warning. Select Allow to let the program start.


Once the program is started, select the Disk option, then click the Disk Refresh button and then select your flashdrive from the dropdown box.


You should be able to tell which disk is your flashdrive by the size shown for each drive. In this example, my 8GB flashdrive is easy to pick out.


IMPORTANT: Make sure you select your flashdrive from the dropdown list and not a different drive (if installing to a USB hard drive or an internal drive, make sure it's the correct one). If you accidentally select the wrong drive, you may not be able to boot your system without doing a boot repair.

Now click the Part List Refresh button, then the dropdown box and finally select the Whole disk (MBR) option.


Check the Don't search floppy option, leave all the other options unchecked and cleared and then click the Install button to install Grub4DOS to the MBR of the flashdrive.


Hopefully, you'll get the message that the installation was successful.


Press Enter to close the Command Prompt window. The Grub4DOS MBR and booting code is now installed on the flashdrive.

The next step is to copy the grldr file to the flashdrive's root folder. Using Windows Explorer, browse to the folder where you unzipped the Grub4DOS program and copy the file to the flashdrive.


Grub4DOS is now installed on the flashdrive. Next we will show howt to boot an ISO from Grub4DOS.


Section 2 - Setup Booting an ISO File (Acronis ISO)

The ability to boot ISO files directly is one of the newer features of Grub4DOS. It is still a work in progress and has problems with some types of ISO files. However, in my use and testing, it hasn't had any problems with the Acronis ISO files.

The flexibility allowed by being able to boot the ISO file directly makes keeping multiple versions and/or different builds on the same flashdrive an easy task. Adding them is as simple as putting the ISO file on the flashdrive and adding the menu entry to boot it.

As with the partition method, there are only two steps needed to use your Grub4DOS flashdrive in this fashion.

First, run the Acronis Media Builder. However, instead of specifying the flashdrive as the destination device, select to create an ISO file. You can save the ISO file directly to the flashdrive if you wish.

Second, create the Grub4DOS menu.lst file with the entry to start the Acronis Media. The menu.lst file is a plain text file created using the Windows Notepad program. This file must be located in the root folder of the flashdrive. Start the Notepad program and type (or copy and paste) in the following text:


timeout 10
default 0

title Acronis True Image Home 2009 (9,615)
map (hd0,0)/ti-12-9615.iso (hd32)
map --hook
chainloader (hd32)
boot

title CommandLine
commandline

title Reboot
reboot

title Halt
halt


Note: In this example, I've used Acronis True Image Home 2009 (9,615) as the menu entry's title for the Acronis Media. Feel free to use whatever name you want. Also note that I used ti-12-9615.iso for the ISO filename. You can use whatever name is appropriate, however I would recommend you don't put spaces into the ISO's filename.

Save the file to the root folder of the flashdrive with the name: menu.lst

Tip: If Notepad appends a ".txt" to the filename, just rename the file to menu.lst using Windows Explorer

If you have the Windows Explorer option set to hide filename extensions for known file types, you may need to disable it. Otherwise, explorer may display menu.lst when the actual filename is menu.lst.txt. Click here for instructions.


A sample menu.lst file can be downloaded below. If you use it, make sure to rename it to menu.lst once it's on the flashdrive. You will also need to edit it as necessary for your ISO's filename.


Download
Sample menu.lst file

To update this flashdrive to a different version or build of the Acronis Media, just rerun the Media Builder program and save the new ISO file to the flashdrive. If you are replacing an existing ISO file, no other changes are needed. If you are adding an ISO file, edit the menu.lst file and add the new menu entry. For example: If you want to add your True Image Home 10 build 4,942 ISO (ti-10-4942.iso) to the flashdrive, you would put the ISO file on the flashdrive and add the following menu entry:

title Acronis True Image Home 10 (4,942)
map (hd0,0)/ti-10-4942.iso (hd32)
map --hook
chainloader (hd32)
boot


Additional Notes
  • In these instructions, the timout value for booting the default Grub4DOS menu entry is 10 seconds. If you want a shorter or longer time, change the value.
  • If you setup to boot the ISO files, you can place the ISO files into folders instead of having them in the root folder. For example: If you want all of your Acronis ISO files to be in the \acronis folder, just modify the entry in the menu.lst file to include the folder in the path to the ISO file: map (hd0,0)/acronis/ti-12-9615.iso (hd32)

Taken From: http://themudcrab.com/acronis_grub4dos.php

An alternative method, to boot an ISO from a USB Flash Disk (PEN), can be found in this Blog here

Monday, June 1, 2009

Adding Disk - Storage To VMWare ESX

In VMWare ESX, in order to be able to use a disk, this should be first in VMWare's own file system format, which is "vmfs3", other will it will not recognize the disk and, you wont be able for example store you virtual machines there.

This is quite is one a big diference between VMWare ESX and the VMWare desktop, version.
So in the next few line I'm going to show how prepare and add a disk to VMWare ESX.

Step #1 Run fdisk -l and find the disk that you want to format with VMFS3.

$ su

# fdisk -l | grep Disk
Disk /dev/sda: 32.2 GB, 32212254720 bytes
Disk /dev/sdb: 53.6 GB, 53687091200 bytes
Disk /dev/sdc: 32.2 GB, 32212254720 bytes
Disk /dev/sdd: 53.6 GB, 53687091200 bytes
Disk /dev/sde: 32.2 GB, 32212254720 bytes
Disk /dev/sdf: 10.7 GB, 10737418240 bytes
Disk /dev/sdg: 32.2 GB, 32212254720 bytes
Disk /dev/sdh: 32.2 GB, 32212254720 bytes
Disk /dev/sdi: 32.2 GB, 32212254720 bytes
Disk /dev/sdj: 21.4 GB, 21474836480 bytes
Disk /dev/sdk: 214.7 GB, 214748364800 bytes Disk /dev/cciss/c0d0: 73.3 GB, 73372631040 bytes


Note: The /dev/sdk is the one I will be adding to VMWare ESX


# fdisk -l /dev/sdk

Disk /dev/sdk: 214.7 GB, 214748364800 bytes
255 heads, 63 sectors/track, 26108 cylinders
Units = cylinders of 16065 * 512 = 8225280 bytes

Device Boot Start End Blocks Id System


Has you can see, sdk doesen't have any partitions,
so we must create one to later on format in the "vmf3" format.

Step #2 Creating a Partition (to format later on in "vmf3")

Note: the partition in this examples, ocupies all of the disk.

First we will create the partition (n) then change the type (t) to fb. Then (w) save the changes. Check fdisk /dev/sda again and list partitions (p) - it should list as fb.


# fdisk /dev/sdk

The number of cylinders for this disk is set to 26108.
There is nothing wrong with that, but this is larger than 1024,
and could in certain setups cause problems with:
1) software that runs at boot time (e.g., old versions of LILO)
2) booting and partitioning software from other OSs
(e.g., DOS FDISK, OS/2 FDISK)

Command (m for help): n
Command action
e extended
p primary partition (1-4)
p

Partition number (1-4): 1
First cylinder (1-26108, default 1):
Using default value 1
Last cylinder or +size or +sizeM or +sizeK (1-26108, default 26108):
Using default value 26108

Command (m for help): t
Selected partition 1
Hex code (type L to list codes): fb
Changed system type of partition 1 to fb (Unknown)

Command (m for help): w
The partition table has been altered!

Calling ioctl() to re-read partition table.
Syncing disks.


Note: I tried to create an extended partition, but it didn't work, fdisk didn't let met change the type to "fb".


Step #3 Then run esxcfg-vmhbadevs -m to see which vmhba devices is mapped to the partion in step #1

# esxcfg-vmhbadevs -m

vmhba1:0:4:1 /dev/sdd1 4866618b-6a9fda41-fba6-00565aa64ffa
vmhba1:0:1:1 /dev/sda1 486660ea-fe9d98aa-8010-00565aa64ffa
vmhba1:0:3:1 /dev/sdc1 48666166-5068fbcd-dfcd-00565aa64ffa
vmhba1:0:2:1 /dev/sdb1 48666146-f15b8e96-2c49-00565aa64ffa
vmhba1:0:6:1 /dev/sdf1 486661b9-4da3f066-3017-00565aa64ffa
vmhba1:0:5:1 /dev/sde1 486661a4-9d3c1b7d-3ec6-00565aa64ffa
vmhba1:0:8:1 /dev/sdh1 486661e5-84ce84f3-acd2-00565aa64ffa
vmhba0:0:0:3 /dev/cciss/c0d0p3 48666bff-9ed64a25-636c-00215aa65f04
vmhba1:0:10:1 /dev/sdj1 4866620f-939412da-7ede-00565aa64ffa
vmhba1:0:7:1 /dev/sdg1 486661d0-debeffc1-9e08-00565aa64ffa
vmhba1:0:9:1 /dev/sdi1 486661f9-4cff8fab-57a6-00565aa64ffa


Because it has no partition, starting with "sdk" (ex: vmhba1:0:9:1 /dev/sdk1) , which is the disks name, let's try to list only the disks to see if VMWare ESX detects it,

# esxcfg-vmhbadevs
vmhba0:0:0 /dev/cciss/c0d0
vmhba1:0:1 /dev/sda
vmhba1:0:2 /dev/sdb
vmhba1:0:3 /dev/sdc
vmhba1:0:4 /dev/sdd
vmhba1:0:5 /dev/sde
vmhba1:0:6 /dev/sdf
vmhba1:0:7 /dev/sdg
vmhba1:0:8 /dev/sdh
vmhba1:0:9 /dev/sdi
vmhba1:0:10 /dev/sdj
vmhba1:0:11 /dev/sdk

The disk is the but there's no partition, we will create it later on.


Step #4 Formating the Previously Created Partition in "vmfs3"

Basicly we will run vmkfstools -C vmfs3 -S "volume name" vmhba#_from_step#3


In the step before we noted that VMWare detected sdk and that it had the id "vmhba1:0:11", but there was no partition, and that by comparing the results from "esxcfg-vmhbadevs -m" (list partitions) and "esxcfg-vmhbadevs" (list disks), in the previous step the id of the partition sdk1 should be "vmhba1:0:11:1", so this is the id we will be using in the format command below.

# vmkfstools -C vmfs3 -S "ESX03" vmhba1:0:11:1

Creating vmfs3 file system on "vmhba1:0:11:1" with blockSize 1048576 and volume label "ESX03".
Successfully created new volume: 4a23df5c-41c0dac6-a39f-00215aa64ffa


Now you have the disk ready ready to add to VMWare ESX,

Step #5 Add the storage to a Blade (fisical PC) in VMWARE ESX,

Just click on one blade "Configuration | Add Storage",
and selectct "Disk/Lun", and Next in following windows.


Note: I think if you add the disk to one blade it, will be added to all the other blades.
I tried to add to a second blade and it didn't allowed me to do that.

Step #7 Create Virtual Machines, ande select the DataStorage previously created

Listing Partitions and Disks with FDISK

## List All Partions and Disks #####

In order to list all partions and disks using fdisk, while root just type:

# fdisk -l

And you will get disks and partitions informations all together:

Disk /dev/sda: 32.2 GB, 32212254720 bytes
255 heads, 63 sectors/track, 3916 cylinders
Units = cylinders of 16065 * 512 = 8225280 bytes

Device Boot Start End Blocks Id System
/dev/sda1 * 1 3916 31455206 fb Unknown

Disk /dev/sdb: 53.6 GB, 53687091200 bytes
255 heads, 63 sectors/track, 6527 cylinders
Units = cylinders of 16065 * 512 = 8225280 bytes

Disk /dev/cciss/c0d0: 73.3 GB, 73372631040 bytes
255 heads, 63 sectors/track, 8920 cylinders
Units = cylinders of 16065 * 512 = 8225280 bytes

Device Boot Start End Blocks Id System
/dev/cciss/c0d0p1 * 1 13 104391 83 Linux
/dev/cciss/c0d0p2 14 650 5116702+ 83 Linux
/dev/cciss/c0d0p3 651 8584 63729855 fb Unknown
/dev/cciss/c0d0p4 8585 8920 2698920 f Win95 Ext'd (LBA)
/dev/cciss/c0d0p5 8585 8653 554211 82 Linux swap
/dev/cciss/c0d0p6 8654 8907 2040223+ 83 Linux
/dev/cciss/c0d0p7 8908 8920 104391 fc Unknown


This is quite confusing if you have multiple disks with multiple partitions, so next I'm, going to show you how to, only show the disks and then, pick a disk and then list it`s partitions


## List All Disks #####

Now I'm going to show you how to list only the disks, for that while in root just type:

# fdisk -l | grep Disk

The result shold be something like this:

Disk /dev/sdk doesn't contain a valid partition table
Disk /dev/sda: 32.2 GB, 32212254720 bytes
Disk /dev/sdb: 53.6 GB, 53687091200 bytes
Disk /dev/cciss/c0d0: 73.3 GB, 73372631040 bytes

Here you only see the harddrives and no partitions, now you can pick which hardrive you want to see the partitions. Im picking
/dev/cciss/c0d0, and next i will show you only it's partitions.


## List a Disk's Partitions #####

Now listing all the partitions in one disk, for that while in root just type:

# fdisk -l /dev/cciss/c0d0

The result should be something like this:

Disk /dev/cciss/c0d0: 73.3 GB, 73372631040 bytes
255 heads, 63 sectors/track, 8920 cylinders
Units = cylinders of 16065 * 512 = 8225280 bytes

Device Boot Start End Blocks Id System
/dev/cciss/c0d0p1 * 1 13 104391 83 Linux
/dev/cciss/c0d0p2 14 650 5116702+ 83 Linux
/dev/cciss/c0d0p3 651 8584 63729855 fb Unknown
/dev/cciss/c0d0p4 8585 8920 2698920 f Win95 Ext'd (LBA)
/dev/cciss/c0d0p5 8585 8653 554211 82 Linux swap
/dev/cciss/c0d0p6 8654 8907 2040223+ 83 Linux
/dev/cciss/c0d0p7 8908 8920 104391 fc Unknown


That's all, happy listing...