Friday, April 10, 2009

Making Web Pages In Java with Google Web Toolkit

Web 2.0 Development with the Google Web Toolkit

There's much hype related to Web 2.0, and most people agree that software like Google Maps, Gmail and Flickr fall into that category. Wouldn't you like to develop similar programs allowing users to drag around maps or refresh their e-mail inboxes, all without ever needing to reload the screen?

Until recently, creating such highly interactive programs was, to say the least, difficult. Few development tools, little debugging help and browser incompatibilities all added up to a complex mix. Now, however, if you want to produce such cutting-edge applications, you can use modern software methodologies and tools, work with the high-level Java language, and forget about HTML, JavaScript and whether Firefox and Internet Explorer behave the same way. The Google Web Toolkit (GWT) makes it easy to do a better job and produce more modern Web 2.0 programs for your users.

What Is Web 2.0?

This question has several answers, including Sir Tim Berners-Lee's (the creator of the World Wide Web) view that it's just a reuse of components that were there already. It originally was coined by Tim O'Reilly, promoting “the Web as a platform”, with data as a driving force and technologies fostering innovation by assembling systems and sites that get information and features from distributed, different, independent developers and services.

This notion goes along with the idea of letting users run applications entirely through a browser, without installing anything on their machines. These new programs usually feature rich, user-friendly interfaces, akin to the ones you would get from an installed program, and they generally are achieved with AJAX (see the What Is AJAX? sidebar) to reduce download times and speed up display time.

Web 2.0 applications use the same infrastructure that developers are largely already familiar with: dynamic HTML, CSS and JavaScript. In addition, they often use XML or JSON for representing and communicating data between the server and browser. This data communication is often done using Web service requests via the DOM API XMLHttpRequest.

What Is the Google Web Toolkit?

The Google Web Toolkit (GWT—rhymes with “nitwit”) is a tool for Web programmers. Its first public appearance was in May 2006 at the JavaOne conference. Currently (at the time of this writing), version 1.5.3 has just been released. It is licensed mainly under the Apache 2.0 Open Source License, but some of its components are under different licenses. Don't confuse JavaScript with Java; despite the name, the languages are unrelated, and the similarities come from some common roots.

In short, GWT makes it easier to write high-performing, interactive, AJAX applications. Instead of using the JavaScript language (which is powerful, but lacking in areas like modularity and testing features, making the development of large-scale systems more difficult), you code using the Java language, which GWT compiles into optimized, tight JavaScript code. Moreover, plenty of software tools exist to help you write Java code, which you now will be able to use for testing, refactoring, documenting and reusing—all these things have become a reality for Web applications.

You also can forget about HTML and DHTML (Dynamic HTML, which implies changing the actual source code of the page you are seeing on the fly) and some additional subtle compatibility issues therein. You code using Java widgets (such as text fields, check boxes and more), and GWT takes care of converting them into basic HTML fields and controls. Don't worry about localization matters either; with GWT, it's easy to produce locale-specific versions of code.

There's another welcome bonus too. GWT takes care of the differences between browsers, so you don't have to spend time writing the same code in different ways to please the particular quirks of each browser. Typically, if you just code away and don't pay attention to those small details, your site will end up looking fine in, say, Mozilla Firefox, but won't work at all in Internet Explorer or Safari. This is a well-known classic Web development problem, and it's wise to plan for compatibility tests before releasing any site. GWT lets you forget about those problems and focus on the task instead.

According to its developers, GWT produces high-quality code that matches (and probably surpasses) the quality (size and speed) of handwritten JavaScript. The GWT Web page contains the motto “Faster AJAX than you can write by hand!”

GWT also endeavors to minimize the resulting code size to speed up transfers and shorten waiting time. By default, the end code is mostly unreadable (being geared toward the browser, not a snooping user), but if you have any problems, you can ask for more legible code so you can understand the relationship between your Java code and the produced JavaScript.

Getting Started with GWT

Before installing GWT, you should have a few things already installed on your machine:

  • Java Development Kit (JDK), so you can compile and test Java applications; several more tools also are included.

  • Java Runtime Environment (JRE), including the Java Virtual Machine (JVM) and all the class libraries required for production and development environments.

  • A development environment—Google's own developers use Eclipse, so you might want to follow suit. Or, you can install GWT4NB and do some tweaking and fudging and work with NetBeans, another popular development environment.

GWT itself weighs in at about 27MB; after downloading it, extract it anywhere you like with tar jxf ../gwt-linux-1.5.3.tar.bz2. No further installation steps are required. You can use GWT from any directory.

For this article, I used Eclipse. For more serious work, you probably also will require some other additions, such as the Data Tools Platform (DTP), Eclipse Java Development Tools (JDT), Eclipse Modeling Framework (EMF) and Graphical Editing Framework (GEF), but you easily can add those (and more) with Eclipse's own software update tool (you can find it on Eclipse's main menu, under Help—and no, I don't know why it is located there).

Before starting a project, you should understand the four components of GWT:

  • When you are developing an application, GWT runs in hosted mode and provides a Web browser (and an embedded Tomcat Web server), which allows you to test your Java application the same way your end users would see it. Note that you will be able to use the interactive debugging facilities of your development suite, so you can forget about placing alert() commands in JavaScript code.

  • To help you build an interface, there is a Web interface library, which lets you create and use Web browser widgets, such as labels, text boxes, radio buttons and so on. You will do your Java programming using those widgets, and the compilation process will transform them into HTML-equivalent ones.

  • Because what runs in the client's browser is JavaScript, there needs to be a Java emulation library, which provides JavaScript-equivalent implementations of the most common Java standard classes. Note that not all of Java is available, and there are restrictions as to which classes you can use. It's possible that you will have to roll your own code if you want to use an unavailable class. As of version 1.5, GWT covers much of the JRE. In addition, as of version 1.5, GWT supports using Java 5.

  • Finally, in order to deploy your application, there is a Java-to-JavaScript compiler (translator), which you will use to produce the final Web code. You will need to place the resulting code, the JavaScript, HTML and CSS on your Web server later, of course.

If you are like most programmers, you probably will be wondering about your converted application's performance. However, GWT generates ultra-compact code that can be compressed and cached further, so end users will download a few dozen kilobytes of end code, only once. Furthermore, with version 1.5, the quality of the generated code is approaching (and even surpassing) the quality of handwritten JavaScript, especially for larger projects. Finally, because you won't need to waste time doing debugging for every existing Web browser, you will have more time for application development itself, which lets you produce more features and better applications.

A GWT Example

Now, let's turn to a practical example. Creating a new project is done with the command line rather than from inside Eclipse. Create a directory for your project, and cd to it. Then create a project in it, with:

/path/to/GWT/projectCreator -eclipse ProjectName

Next, create a basic empty application, with:

/path/to/GWT/applicationCreator -eclipse ProjectName \
com.CompanyName.client.ApplicationName

Then, open Eclipse, go to File→Import→General, choose Existing Projects into Workspace, and select the directory in which you created your project. Do not check the Copy Projects into Workspace box so that the project will be left at the directory you created.

After doing this, you will be able to edit both the HTML and Java code, add new classes and test your program in hosted mode, as described earlier. When you are satisfied with the final product, you can compile it (an appropriate script was generated when you created the original project) and deploy it to your Web server.

Let's do an example mashup. We're going to have a text field, the user will type something there, and we will query a server (okay, with only one server, it's not much of a mashup, but the concept can be extended easily) and show the returned data. Of course, for a real-world application, we wouldn't display the raw data, but rather do further processing on it. The example project itself will be called exampleproject, and its entry point will be example, see Listing 1 and Figure 1.

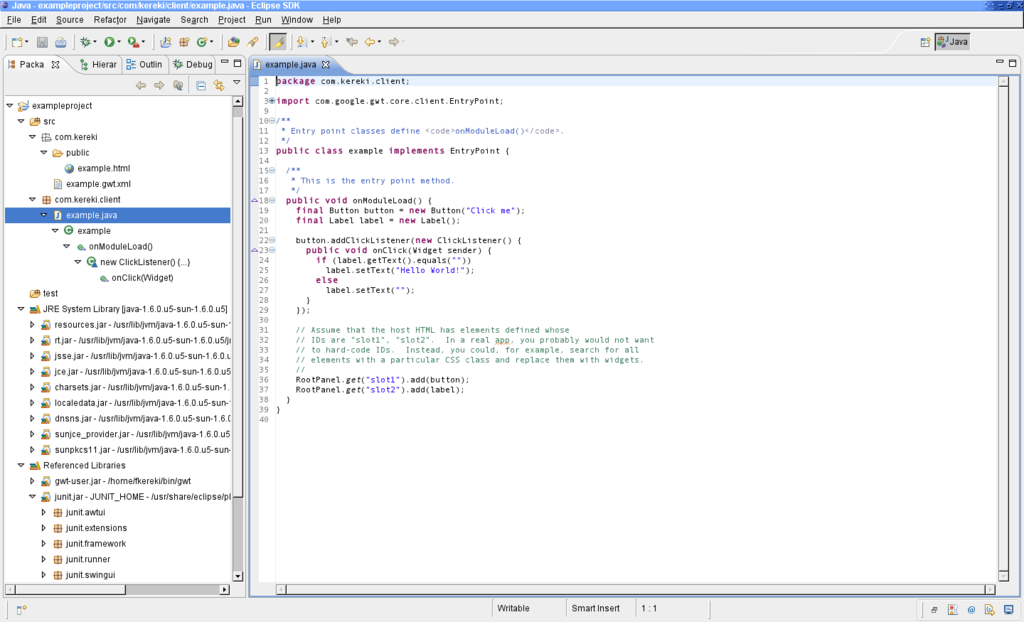
Figure 1. The recently imported project—the code just shows a welcome message.

According to the Getting Started instructions on the Google Web Toolkit site, you should click the Run button to start running your project in hosted mode, but I find it more practical to run it in debugging mode. Go to Run→Debug, and launch your application. Two windows will appear: the development shell and the wrapper HTML window, a special version of the Mozilla browser. If you do any code changes, you won't have to close them and relaunch the application. Simply click Refresh, and you will be running the newer version of your code.

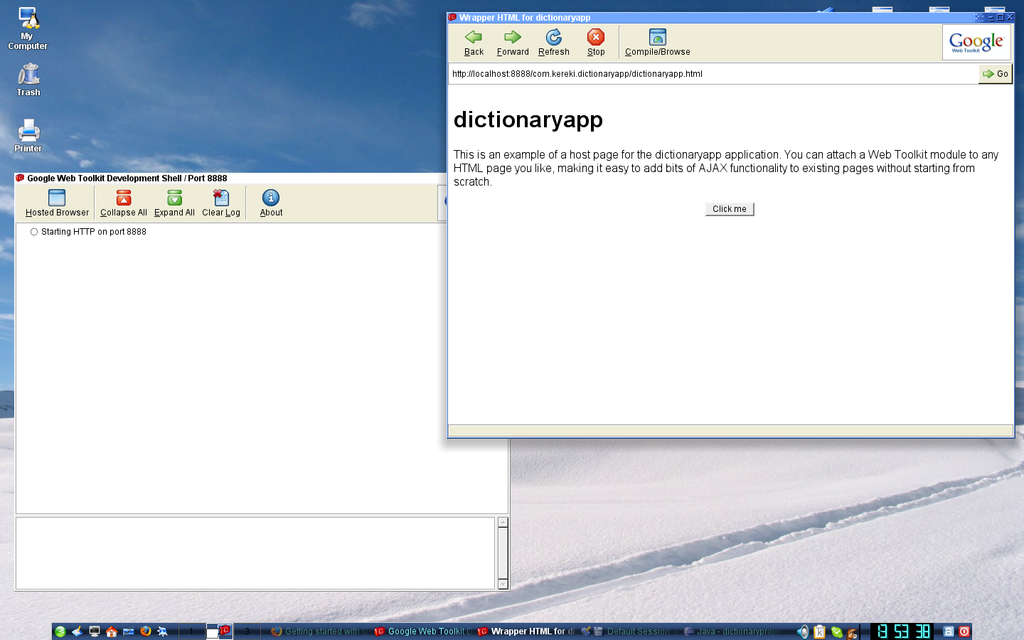
Figure 2. Running the Created Application the First Time, in Hosted Mode

Now, let's get to our changes. Because we're using JSON and HTTP, we need to add a pair of lines:


and:


to the example.gwt.xml file. We'll rewrite the main code and add a couple packages to do calls to servers that provide JSON output (see The Same Origin Policy sidebar). For this, add two classes to the client: JSONRequest and JSONRequestHandler; their code is shown in Listings 2 and 3.

Let's opt to create the screen completely with GWT code. The button will send a request to a server (in this case, Yahoo! News) that provides an API with JSON results. When the answer comes in, we will display the received code in a text area. The complete code is shown in Listing 4, and Figure 3 shows the running program.

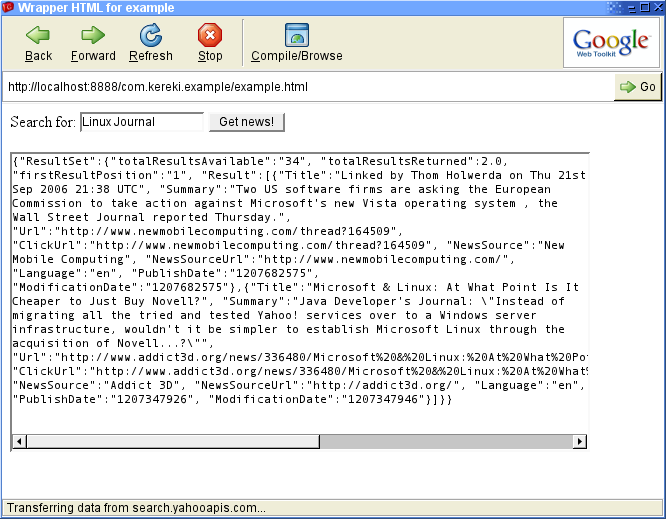
Figure 3. The Application, Running in Hosted Mode

After testing the application, it's time to distribute it. Go to the directory where you created the project, run the compile script (in this case, example_script.sh), and copy the resulting files to your server's Web pages directory. In my case, with OpenSUSE, it's /srv/www/htdocs, but with other distributions, it could be /var/www/html (Listing 5). Users could use your application by navigating to http://127.0.0.1/com.kereki.example/example.html, but of course, you probably will select another path.

Conclusion

We have written a Web page without ever writing any HTML or JavaScript code. Moreover, we did our coding in a high-level language, Java, using a modern development environment, Eclipse, full of aids and debugging tools. Finally, our program looks quite different from classic Web pages. It does no full-screen refreshes, and the user experience will be more akin to that of a desktop program.

GWT is a very powerful tool, allowing you to apply current software engineering techniques to an area that is lacking good, solid development tools. Being able to apply Java, a high-level modern language, to solve both client and server problems, and being able to forget about browser quirks and incompatibilities, should be enough to make you want to give GWT a spin.

Federico Kereki is a Uruguayan Systems Engineer, with more than 20 years' experience teaching at universities, doing development and consulting work, and writing articles and course material. He has been using Linux for many years now, having installed it at several different companies. He is particularly interested in the better security and performance of Linux boxes.

Taken From: Linux Journal, Issue: 179, February 2009 - Web 2.0 Development with the Google Web Toolkit

Download, Store and Install Packages in Ubuntu Automaticly

I normaly like to have the packages I install stored, to use later on. This is helpfull you don't have an internet conection or have a slow one, or need to install the same stuff on multiple machine.

So I have made a couple off scripts in bash language, which I had never used before, so these migth no be the best scripts in the world but they get the jobe done.

The first script (download_and_store) to download and store in folders all of my favorite apps, and another that installs every apps (install_all) on those folders.


download_and_store
--------------------------------------------------------------------------------------------------

#!/bin/bash

## List of packages to download ####
L_PACKAGES_TO_DOWNLOAD="

vlc
mplayer
amarok
wireshark
k3b

"
################################

D_APTGET_CACHE="/var/cache/apt/archives"

echo "Where will you want to store the packages"
read D_DOWNLOADED_PACKAGES

# clean apt-get's cache
apt-get clean

# create the root directory for the downloaded package ##
mkdir -p $D_DOWNLOADED_PACKAGES


for i in $L_PACKAGES_TO_DOWNLOAD ; do ## go through all the packages on the list

## download apt-get packages whithout instaling them (apt-get cache) ##
apt-get install -d $i

## create the dir for the downloaded package ##
mkdir $D_DOWNLOADED_PACKAGES/$i

## move de downloaded package on apt-get chache to the created dir ##
mv $D_APTGET_CACHE/*.deb $D_DOWNLOADED_PACKAGES/$i

# clean apt-get's cache
apt-get clean

done


install_all
----------------------------------------------------------------------

#!/bin/bash
for i in $( ls -p | grep "/" ); do ## go through every dir
echo ">>>>>>>>>>>>>>>>>>>>>"
cd $i ## enter a dir (where the packages and dependecies are)
echo Dir Actual: $(pwd)
dpkg -i *.deb ## install all debs (package and its dependencies)
cd ..
echo "<<<<<<<<<<<<<<<<<<<<<" done


Now for the demonstration, lets use download_and_store to download all of you favorite apps.

# create a file for download_and_store #####
$ sudo gedit download_and_store

paste the script above, and change the list L_PACKAGES_TO_DOWNLOAD, to include you favorite packages (these are separeted by a space or newline).

# give the script permitions to execute #####
$ sudo chmod 777 /path_to_it/download_and_store

# execute download_and_store
$ cd /path_to_it
$ ./download_and_store
Where will you want to store the packages
/home/my_user/Desktop/saved_apps --> you chose this dir

Now just wait...

Once its over you will have in /home/my_user/Desktop/saved_apps a folder for each application, for example vlc, you wil have a dir named vlc whith the vlc package and all of it's dependencies.

============================
Now, lets use install_all to install all of your downloaded apps.

# create a file for install_all #####
$ sudo gedit /home/my_user/Desktop/saved_apps/install_all

as you can see install_all must be in the root dir you inputed earlier ( /home/my_user/Desktop/saved_apps), this script will install all he can find in the dirs below.

# give the script permitions to execute #####
$ sudo chmod 777 /home/my_user/Desktop/saved_apps/install_all

# execute download_and_store
$ cd /home/my_user/Desktop/saved_apps/
$ ./install_all

Now wait...

There you apps should all be installed.

These scripts are very basic, these are my first in bash programing, and aren't fully tested, but if you can get an idea from them, or even improve them I'm happy.

Thursday, April 9, 2009

Installing ZenOSS on Ubuntu 8.10 (Hardy Heron)

Hello previously, I have posted how to install Zenoss and setup a test environment (you can find it here), but there we instaled Zenoss in CentOS, here I'm going to show you how to install it on Ubuntu 8.10

# Install Apache With It's Documentation #####
$ sudo apt-get install apache2 apache2-doc

# Start Apache (it should already be started) #####
$ sudo /etc/init.d/apache2 start


# Test Apache #####

Type on Mozilla Firefox: http://127.0.0.1/
It souhld read: It works!


# Instaling MySQL and PHP necessary Dependencies #####

$ sudo apt-get install mysql-server mysql-client
Type in mySQL's root password in the upcoming textbox.


# Instaling SNMP Query tools #####
$ sudo apt-get install snmp


# Downloading ZenOSS #####

In http://www.zenoss.com/download/links?creg=no
you can see all the suported distributions,
you just have to pick yours if it's there,
otherwise pick the closets.

In runing Ubuntu 8.10, which isnt there so I go for
the Ubuntu 8.04, here's the link:
http://sourceforge.net/project/downloading.php?groupname=zenoss&filename=zenoss-stack-2.3.3-linux.bin&use_mirror=freefr

# Installing ZenOSS #####

$ cd /path_to_zenoss_executable_dir/

$ sudo chmod 777 zenoss-stack-2.3.3-linux.bin

$ sudo ./zenoss-stack-2.3.3-linux.bin

Type in the data the installer gui asks you, like the
database root login.


# Logging in into ZenOSS #####

After installing it should open your browser on the ZenOSS
login page, if not just type on your browser:

http://localhost:8080/

The default login and password are:

Login: admin
Password: zenoss

Now you can just continue the "Installing Net-SNMP on Linux Clients" on the previous post that you cam find here.

Setting Up a SNMP Server in Ubuntu

What is net-snmp ?

Simple Network Management Protocol (SNMP) is a widely used protocol for monitoring the health and welfare of network equipment (eg. routers), computer equipment and even devices like UPSs. Net-SNMP is a suite of applications used to implement SNMP v1, SNMP v2c and SNMP v3 using both IPv4 and IPv6.

Net-SNMP Tutorials
http://www.net-snmp.org/tutorial/tutorial-5/

Net-SNMP Documentation
http://www.net-snmp.org/docs/readmefiles.html

# Installing SNMP Server in Ubuntu #####

$ sudo apt-get install snmpd


# Configuring SNMP Server #####

/etc/snmp/snmpd.conf - configuration file for the Net-SNMP SNMP agent.

/etc/snmp/snmptrapd.conf - configuration file for the Net-SNMP trap daemon.


Set up the snmp server to allow read access from the other machines in your network for this you need to open the file /etc/snmp/snmpd.conf change the following Configuration and save the file.

$ sudo gedit /etc/snmp/snmpd.conf


snmpd.conf
#---------------------------------------------------------------
######################################
# Map the security name/networks into a community name.
# We will use the security names to create access groups
######################################

# sec.name source community

com2sec my_sn1 localhost my_comnt
com2sec my_sn2 192.168.10.0/24 my_comnt


####################################
# Associate the security name (network/community) to the
# access groups, while indicating the snmp protocol version
####################################

# sec.model sec.name
group MyROGroup v1 my_sn1
group MyROGroup v2c my_sn1
group MyROGroup v1 my_sn2
group MyROGroup v2c my_sn2


group MyRWGroup v1
my_sn1
group MyRWGroup v2c my_sn1
group MyRWGroup v1 my_sn2
group MyRWGroup v2c my_sn2

#######################################
# Create the views on to which the access group will have access,
# we can define these views either by inclusion or exclusion.
# inclusion - you access only that branch of the mib tree
# exclusion - you access all the branches except that one
#######################################

# incl/excl subtree mask (opcional)
view my_vw1 included .1 80
view my_vw2 included .iso.org.dod.internet.mgmt.mib-2.system

#######################################
# Finaly associate the access groups to the views and give them
# read/write access to the views.
#######################################

# context sec.model sec.level match read write notif
access MyROGroup "" any noauth exact my_vw1 none none
access MyRWGroup "" any noauth exact my_vw2 my_vw2 none
# -----------------------------------------------------------------------------


# Give access to other interfaces besides the loopback #####

$ sudo gedit /etc/default/snmpd

find the line:

SNMPDOPTS='-Lsd -Lf /dev/null -u snmp -I -smux -p /var/run/snmpd.pid 127.0.0.1'

and change it to:

SNMPDOPTS='-Lsd -Lf /dev/null -u snmp -I -smux -p /var/run/snmpd.pid'


# Restart snmpd to load de new config #####

$ sudo /etc/init.d/snmpd restart


# Test the SNMP Server #####


$ sudo apt-get install snmp

$
sudo snmpwalk -v 2c -c my_comnt localhost system

Tuesday, January 27, 2009

Installing the SMF Forum on Linux

# Install Apache With It's Documentation #####
$ sudo apt-get install apache2 apache2-doc

# Start Apache (it should already be started) #####
$ sudo /etc/init.d/apache2 start


# Test Apache #####

Type on Mozilla Firefox: http://127.0.0.1/
It souhld read: It works!

Note: The message "It works!" can be found at the /var/www
directorie, which is apaches's root directory, wich is were
we will install SMF.


# Instaling MySQL and PHP necessary Dependencies #####

$ sudo apt-get install mysql-server mysql-client
Type in mySQL's root password in the upcoming textbox.

$ sudo apt-get install libapache2-mod-php5 libapache2-mod-perl2

$ sudo apt-get install php5 php5-cli php5-common php5-curl php5-dev php5-gd php5-imap php5-ldap

$ sudo apt-get install php5-mhash php5-mysql php5-odbc curl libwww-perl imagemagick


# Extract SMF #####

$ unzip smf_1-1-7_install.zip


# Installing SMF in Apache #####

# Copy SMF to /var/www (apache root dir)
$ sudo cp -vr smf_1-1-7_install /var/www


# Give Apache Ownership Over SMF Files (apache-user: www-data) #####

$ sudo chown www-data -vR /var/www/smf_1-1-7_install/*


# Restart Apache #####

$ sudo /etc/init.d/apache2 restart


# Delete Apache's Test Page #####

$ sudo rm -rf /var/www/index.html


# Configuring SMF #####

Type on Mozilla Firefox:
http://127.0.0.1/smf_1-1-7_install/install.php
and configure SMF acording to the presented instructions.


Now your forum is on:

http://127.0.0.1/smf_1-1-7_install/index.php
or
http://127.0.0.1/smf_1-1-7_install/

Thursday, January 8, 2009

Installing a Web Application (SugarCRM) on a WebHost

The web application in this example is SugarCRM (SugarCE-5.0.0f) which I already shown how to install on you own host here. Now I'm going to show you how to install it on a WebHost (like BlueHost or others). Installing a web application on a web host is a bit trickier because what you can do on the webhost is very limited.

Im going to assume that you have SugarCRM working on you computer using the howto about installing SugarCRM on your own webhost you can find here. We are going to use this as a basis of comparison between the configs you have localy and the ones on the webhost. You may not need this.


Lets Start...

Create on the webhost the folder SugarCRM, using an FTP client like gftp.

Upload a file php.info (below) on to the folder SugarCRM on the webhost in order to obtain information about the instaled modules and php.ini (/etc/php5/apache2/php.ini) configuration, since you can't access them directly.


Copy the phpinfo.php to your local SugarCRM folder at the apache root (/var/www), not because you are limited but to make it easyer to compare with the webhost config

$ cp /path_to_phpinfo/phpinfo.php /var/www/SugarCRM


Check if the webhost as the apache modules you need

On the browser execute:

http//www.your_domain_on_the_webhost.com/SugarCRM/phpinfo.php

and check the "Loaded Modules" for the needed modules, if you dont now the modules you need execute also:

http://127.0.0.1/SugarCRM/phpinfo.php

and compare the modules you have localy to the the ones on the webhost, the modules you have locally migth not all be needed but if your webhost has them it will work for sure. If there are missing modules contact you webhost and ask them to install them.

Extracting SugarCRM

$ unzip SugarCE-5.0.0f.zip

From now on we are going to prepare on our local machine SugarCRM, in order to upload to the webhost all thats necessary, to minimize the problems.

Defining the read and write permissions on some of SugarCRM's files

$ cd /path_to_extracted_sugar/SugarCE-Full-5.0.0f

$ sudo chmod 766 config.php

$ sudo chmod 766 custom

$ sudo chmod -R 766 data

$ sudo chmod -R 766 cache

$ sudo chmod -R 766 modules


Creating the the SugarCRM sessions directory, seen that by default SugarCRM sessions directory woul be /var/lib/php/session to wich on the webhost we won't have access.

$ cd /path_to_extracted_sugar/SugarCE-Full-5.0.0f

$ mkdir session_save

$ sudo chmod 770 session_save


Configuring php.ini via .htaccess

Seen that we dont have access to php.ini on the webhost (/etc/php5/apache2/php.ini), we are going have to put the configurations we need on the file .htaccess, notice that the configurations on .htaccess only affects the directory where it is and those bellow it.

In order to now what to put on .htaccess, what I did was, execute the phpinfo.php on my local SugarCRM folder and the Webhost, like this:

http:/www.your_domain_on_the_webhost.com/SugarCRM/phpinfo.php (Webhost SugarCRM)

http://127.0.0.1/phpinfo.php (Local SugarCRM)

And saw the differences between the different variables in "Configuration - PHP Core" (php.ini config), and changed the ones in the webhost that were different to the value the local ones had. They not all be needed but if it work locally on the web host should work to. The result was the following .htaccess:

.htaccess - put in /path_to_extracted_sugar/SugarCE-Full-5.0.0f
--------------------------------------------------------------------

php_value memory_limit 50M
php_value upload_max_filesize 10M
php_value allow_call_time_pass_reference On
php_value allow_url_fopen On
php_value display_errors On
php_value enable_dl On
php_value magic_quotes_gpc On
php_value register_long_arrays On
php_value safe_mode Off
php_value session.save_path /home/my_ftp_user_name/SugarCRM/session_save

The last value php_value session.save_path you have to ask to you webhost, where on in their machine is the top folder you access via FTP, which in my case is /home/my_user_name/, the rest is same (SugarCRM/session_save). Or you can always try to gess it /home/your_ftp_user_name.


Nowing that after the upload of SugarCRM to the webhost in order for SugarCRM to work, like any other webapp, the must be owned by the apache user. Now the problem is, that if apache owns the the files you wont be able to access the if there's some kind of problem, or even delete them.

My solution for this problem is giving the same read,write, execute permitions that the owner has, to the group and being a part of this group, like this you will have the same permitions you had before apache became the owner of the files.

In order to do that we are going to use the following script:

usertogroup
---------------------
#!/bin/ksh
echo "Enter Base Directory: "
read source_dir
for file in `find $source_dir`
do
#full=`ls -ld $file |awk '{print $1}'`
owner=`ls -ld $file | cut -c2-4`
#echo "$full $file ----------------> chmod g+$owner $file"
chmod g+$owner $file
done

$ sudo chmod 777 usertogroup

$ sh usertogroup
Enter Base Directory:
/path_to_extracted_sugar/SugarCE-Full-5.0.0f


Now that we have SugarCRM prepared in our computer, lets upload the contents off /path_to_extracted_sugar/SugarCE-Full-5.0.0f to the SugarCRM
folder that we created before, using an FTP client like gFTP.

The folowing steps you have to ask the webhost to do the following:

- Change the owner of all of the SugarCRM files to the apache user

- Add our username to the group that the file belongs to.


Now you should be able to configure SugarCRM, by executing the following in the browser:

http://www.your_domain_on_the_webhost.com/SugarCRM/install.php

and configure SugarCRM, once configure you can access SugarCRM's main page by executing the following in the web browser:

http://www.your_domain_on_the_webhost.com/SugarCRM/index.php

OR

http://www.your_domain_on_the_webhost.com/SugarCRM

And thats it, now you sould have SugarCRM up and running.

Sharing Internet on Linux

Hello there, in this post I'm going to show you how to share an Internet connection regardless off you having a public ip or not, you just need to have Internet on the computer that`s going to make the share.

I don't now if this is the most correct way to do it, but I can tell you that it worked on my machine which was running Ubuntu 8.10.

The picture below shows my test scenario, to make it easier for you to map it to your own.


click on the picture for a better viewing!!!

As you can see on the picture above I shared PC1's Internet with PC2, my PC2 was also running Linux but it could also be running Windows, MacOS, etc.

The IP configuration for the link between PC1 and PC2 was done manualy, but you can have an DHCP Server on PC1 dictating the IPs, DNS Servers, Gateway for both PCs.

What we are configuring is an IP Forwanding using the iptables, NAT MASQUERING.

As you can see on the picture you can see the DNS Servers (red an blue) I used on PC2 was the same servers that the wlan0 interface (the one with internet) on PC1, because if PC1 can reach the servers so will PC2.

First configure the interfaces that make the link between PC1 and PC2, you can configure any private network you want, i used the 10.0.0.0/8 network (see picture), gave the IP 10.0.0.1 to PC1, and 10.0.0.2 to PC2 and defined its Gateway as 10.0.0.1 (PC1) in order for it to send it's packets for the internet to PC1. On PC2 don't forget the DNS Servers that are the same that you have on PC1 in the interface with internet (wlan0), in Ubuntu you can find the DNS Servers, by tipping the following on the bash, so type this on PC1:

$ cat /etc/resolv.conf

# Generated by NetworkManager
domain hello.there
search hello.there
nameserver 192.168.1.210
nameserver 192.168.1.216
nameserver 192.168.1.215


Now that you have the link between both PCs configured (2 PCs on the same private network, and DNS Servers on PC2), just type the following on the bash in order to do the share.

$ su

# echo 1 > /proc/sys/net/ipv4/ip_forward

# exit

$ sudo iptables -t nat -A POSTROUTING -s 10.0.0.0/8 -o wlan0 -j MASQUERADE

On the last command you if you configured a different private ip range, between the two PCs, you should change the 10.0.0.0/8 onto the one you chose and change the wlan0 to the interface that has the Internet on PC1.

And now you should have Internet both on PC1 and PC2.

Note: If instead of PC2 you have a switch/hub conected to PC1, you can use PC1 to serve multiple PCs (PC2, PC3, PC4, ...), you just need to make the same IP configuration that you did for PC2, only chanaging the the IP (PC2: 10.0.0.2, PC3: 10.0.0.3, PC4: 10.0.0.4) and connect these to the switch.

OR

Another solution to share with more than one PC is PC1 having multiple interfaces onto which PC2, PC3, PC4, ..., connected directly, as above make the same IP configuration that you did for PC2, only changing the the IP (PC2: 10.0.0.2, PC3: 10.0.0.3, PC4: 10.0.0.4) and connect these to PC1.