# Install Apache With It's Documentation #####
$ sudo apt-get install apache2 apache2-doc
# Start Apache (it should already be started) #####
$ sudo /etc/init.d/apache2 start
# Test Apache #####
Type on Mozilla Firefox: http://127.0.0.1/
It souhld read: It works!
Note: The message "It works!" can be found at the /var/www
directorie, which is apaches's root directory, wich is were
we will install SMF.
# Instaling MySQL and PHP necessary Dependencies #####
$ sudo apt-get install mysql-server mysql-client
Type in mySQL's root password in the upcoming textbox.
$ sudo apt-get install libapache2-mod-php5 libapache2-mod-perl2
$ sudo apt-get install php5 php5-cli php5-common php5-curl php5-dev php5-gd php5-imap php5-ldap
$ sudo apt-get install php5-mhash php5-mysql php5-odbc curl libwww-perl imagemagick
# Extract SMF #####
$ unzip smf_1-1-7_install.zip
# Installing SMF in Apache #####
# Copy SMF to /var/www (apache root dir)
$ sudo cp -vr smf_1-1-7_install /var/www
# Give Apache Ownership Over SMF Files (apache-user: www-data) #####
$ sudo chown www-data -vR /var/www/smf_1-1-7_install/*
# Restart Apache #####
$ sudo /etc/init.d/apache2 restart
# Delete Apache's Test Page #####
$ sudo rm -rf /var/www/index.html
# Configuring SMF #####
Type on Mozilla Firefox:
http://127.0.0.1/smf_1-1-7_install/install.php
and configure SMF acording to the presented instructions.
Now your forum is on:
http://127.0.0.1/smf_1-1-7_install/index.php
or
http://127.0.0.1/smf_1-1-7_install/
Tuesday, January 27, 2009
Thursday, January 8, 2009
Installing a Web Application (SugarCRM) on a WebHost
The web application in this example is SugarCRM (SugarCE-5.0.0f) which I already shown how to install on you own host here. Now I'm going to show you how to install it on a WebHost (like BlueHost or others). Installing a web application on a web host is a bit trickier because what you can do on the webhost is very limited.
Im going to assume that you have SugarCRM working on you computer using the howto about installing SugarCRM on your own webhost you can find here. We are going to use this as a basis of comparison between the configs you have localy and the ones on the webhost. You may not need this.
Lets Start...
Create on the webhost the folder SugarCRM, using an FTP client like gftp.
Upload a file php.info (below) on to the folder SugarCRM on the webhost in order to obtain information about the instaled modules and php.ini (/etc/php5/apache2/php.ini) configuration, since you can't access them directly.
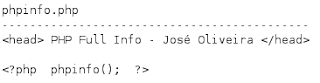
Copy the phpinfo.php to your local SugarCRM folder at the apache root (/var/www), not because you are limited but to make it easyer to compare with the webhost config
$ cp /path_to_phpinfo/phpinfo.php /var/www/SugarCRM
Check if the webhost as the apache modules you need
On the browser execute:
http//www.your_domain_on_the_webhost.com/SugarCRM/phpinfo.php
and check the "Loaded Modules" for the needed modules, if you dont now the modules you need execute also:
http://127.0.0.1/SugarCRM/phpinfo.php
and compare the modules you have localy to the the ones on the webhost, the modules you have locally migth not all be needed but if your webhost has them it will work for sure. If there are missing modules contact you webhost and ask them to install them.
Extracting SugarCRM
$ unzip SugarCE-5.0.0f.zip
From now on we are going to prepare on our local machine SugarCRM, in order to upload to the webhost all thats necessary, to minimize the problems.
Defining the read and write permissions on some of SugarCRM's files
$ cd /path_to_extracted_sugar/SugarCE-Full-5.0.0f
$ sudo chmod 766 config.php
$ sudo chmod 766 custom
$ sudo chmod -R 766 data
$ sudo chmod -R 766 cache
$ sudo chmod -R 766 modules
Creating the the SugarCRM sessions directory, seen that by default SugarCRM sessions directory woul be /var/lib/php/session to wich on the webhost we won't have access.
$ cd /path_to_extracted_sugar/SugarCE-Full-5.0.0f
$ mkdir session_save
$ sudo chmod 770 session_save
Configuring php.ini via .htaccess
Seen that we dont have access to php.ini on the webhost (/etc/php5/apache2/php.ini), we are going have to put the configurations we need on the file .htaccess, notice that the configurations on .htaccess only affects the directory where it is and those bellow it.
In order to now what to put on .htaccess, what I did was, execute the phpinfo.php on my local SugarCRM folder and the Webhost, like this:
http:/www.your_domain_on_the_webhost.com/SugarCRM/phpinfo.php (Webhost SugarCRM)
http://127.0.0.1/phpinfo.php (Local SugarCRM)
And saw the differences between the different variables in "Configuration - PHP Core" (php.ini config), and changed the ones in the webhost that were different to the value the local ones had. They not all be needed but if it work locally on the web host should work to. The result was the following .htaccess:
.htaccess - put in /path_to_extracted_sugar/SugarCE-Full-5.0.0f
--------------------------------------------------------------------
php_value memory_limit 50M
php_value upload_max_filesize 10M
php_value allow_call_time_pass_reference On
php_value allow_url_fopen On
php_value display_errors On
php_value enable_dl On
php_value magic_quotes_gpc On
php_value register_long_arrays On
php_value safe_mode Off
php_value session.save_path /home/my_ftp_user_name/SugarCRM/session_save
The last value php_value session.save_path you have to ask to you webhost, where on in their machine is the top folder you access via FTP, which in my case is /home/my_user_name/, the rest is same (SugarCRM/session_save). Or you can always try to gess it /home/your_ftp_user_name.
Nowing that after the upload of SugarCRM to the webhost in order for SugarCRM to work, like any other webapp, the must be owned by the apache user. Now the problem is, that if apache owns the the files you wont be able to access the if there's some kind of problem, or even delete them.
My solution for this problem is giving the same read,write, execute permitions that the owner has, to the group and being a part of this group, like this you will have the same permitions you had before apache became the owner of the files.
In order to do that we are going to use the following script:
usertogroup
---------------------
#!/bin/ksh
echo "Enter Base Directory: "
read source_dir
for file in `find $source_dir`
do
#full=`ls -ld $file |awk '{print $1}'`
owner=`ls -ld $file | cut -c2-4`
#echo "$full $file ----------------> chmod g+$owner $file"
chmod g+$owner $file
done
$ sudo chmod 777 usertogroup
$ sh usertogroup
Enter Base Directory:
/path_to_extracted_sugar/SugarCE-Full-5.0.0f
Now that we have SugarCRM prepared in our computer, lets upload the contents off /path_to_extracted_sugar/SugarCE-Full-5.0.0f to the SugarCRM
folder that we created before, using an FTP client like gFTP.
The folowing steps you have to ask the webhost to do the following:
- Change the owner of all of the SugarCRM files to the apache user
- Add our username to the group that the file belongs to.
Now you should be able to configure SugarCRM, by executing the following in the browser:
http://www.your_domain_on_the_webhost.com/SugarCRM/install.php
and configure SugarCRM, once configure you can access SugarCRM's main page by executing the following in the web browser:
http://www.your_domain_on_the_webhost.com/SugarCRM/index.php
OR
http://www.your_domain_on_the_webhost.com/SugarCRM
And thats it, now you sould have SugarCRM up and running.
Sharing Internet on Linux
Hello there, in this post I'm going to show you how to share an Internet connection regardless off you having a public ip or not, you just need to have Internet on the computer that`s going to make the share.
I don't now if this is the most correct way to do it, but I can tell you that it worked on my machine which was running Ubuntu 8.10.
The picture below shows my test scenario, to make it easier for you to map it to your own.
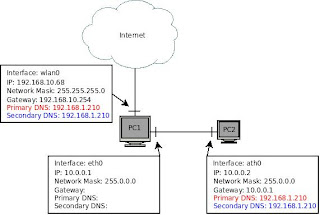
As you can see on the picture above I shared PC1's Internet with PC2, my PC2 was also running Linux but it could also be running Windows, MacOS, etc.
The IP configuration for the link between PC1 and PC2 was done manualy, but you can have an DHCP Server on PC1 dictating the IPs, DNS Servers, Gateway for both PCs.
What we are configuring is an IP Forwanding using the iptables, NAT MASQUERING.
As you can see on the picture you can see the DNS Servers (red an blue) I used on PC2 was the same servers that the wlan0 interface (the one with internet) on PC1, because if PC1 can reach the servers so will PC2.
First configure the interfaces that make the link between PC1 and PC2, you can configure any private network you want, i used the 10.0.0.0/8 network (see picture), gave the IP 10.0.0.1 to PC1, and 10.0.0.2 to PC2 and defined its Gateway as 10.0.0.1 (PC1) in order for it to send it's packets for the internet to PC1. On PC2 don't forget the DNS Servers that are the same that you have on PC1 in the interface with internet (wlan0), in Ubuntu you can find the DNS Servers, by tipping the following on the bash, so type this on PC1:
$ cat /etc/resolv.conf
# Generated by NetworkManager
domain hello.there
search hello.there
nameserver 192.168.1.210
nameserver 192.168.1.216
nameserver 192.168.1.215
Now that you have the link between both PCs configured (2 PCs on the same private network, and DNS Servers on PC2), just type the following on the bash in order to do the share.
$ su
# echo 1 > /proc/sys/net/ipv4/ip_forward
# exit
$ sudo iptables -t nat -A POSTROUTING -s 10.0.0.0/8 -o wlan0 -j MASQUERADE
On the last command you if you configured a different private ip range, between the two PCs, you should change the 10.0.0.0/8 onto the one you chose and change the wlan0 to the interface that has the Internet on PC1.
And now you should have Internet both on PC1 and PC2.
Note: If instead of PC2 you have a switch/hub conected to PC1, you can use PC1 to serve multiple PCs (PC2, PC3, PC4, ...), you just need to make the same IP configuration that you did for PC2, only chanaging the the IP (PC2: 10.0.0.2, PC3: 10.0.0.3, PC4: 10.0.0.4) and connect these to the switch.
OR
Another solution to share with more than one PC is PC1 having multiple interfaces onto which PC2, PC3, PC4, ..., connected directly, as above make the same IP configuration that you did for PC2, only changing the the IP (PC2: 10.0.0.2, PC3: 10.0.0.3, PC4: 10.0.0.4) and connect these to PC1.
I don't now if this is the most correct way to do it, but I can tell you that it worked on my machine which was running Ubuntu 8.10.
The picture below shows my test scenario, to make it easier for you to map it to your own.

click on the picture for a better viewing!!!
As you can see on the picture above I shared PC1's Internet with PC2, my PC2 was also running Linux but it could also be running Windows, MacOS, etc.
The IP configuration for the link between PC1 and PC2 was done manualy, but you can have an DHCP Server on PC1 dictating the IPs, DNS Servers, Gateway for both PCs.
What we are configuring is an IP Forwanding using the iptables, NAT MASQUERING.
As you can see on the picture you can see the DNS Servers (red an blue) I used on PC2 was the same servers that the wlan0 interface (the one with internet) on PC1, because if PC1 can reach the servers so will PC2.
First configure the interfaces that make the link between PC1 and PC2, you can configure any private network you want, i used the 10.0.0.0/8 network (see picture), gave the IP 10.0.0.1 to PC1, and 10.0.0.2 to PC2 and defined its Gateway as 10.0.0.1 (PC1) in order for it to send it's packets for the internet to PC1. On PC2 don't forget the DNS Servers that are the same that you have on PC1 in the interface with internet (wlan0), in Ubuntu you can find the DNS Servers, by tipping the following on the bash, so type this on PC1:
$ cat /etc/resolv.conf
# Generated by NetworkManager
domain hello.there
search hello.there
nameserver 192.168.1.210
nameserver 192.168.1.216
nameserver 192.168.1.215
Now that you have the link between both PCs configured (2 PCs on the same private network, and DNS Servers on PC2), just type the following on the bash in order to do the share.
$ su
# echo 1 > /proc/sys/net/ipv4/ip_forward
# exit
$ sudo iptables -t nat -A POSTROUTING -s 10.0.0.0/8 -o wlan0 -j MASQUERADE
On the last command you if you configured a different private ip range, between the two PCs, you should change the 10.0.0.0/8 onto the one you chose and change the wlan0 to the interface that has the Internet on PC1.
And now you should have Internet both on PC1 and PC2.
Note: If instead of PC2 you have a switch/hub conected to PC1, you can use PC1 to serve multiple PCs (PC2, PC3, PC4, ...), you just need to make the same IP configuration that you did for PC2, only chanaging the the IP (PC2: 10.0.0.2, PC3: 10.0.0.3, PC4: 10.0.0.4) and connect these to the switch.
OR
Another solution to share with more than one PC is PC1 having multiple interfaces onto which PC2, PC3, PC4, ..., connected directly, as above make the same IP configuration that you did for PC2, only changing the the IP (PC2: 10.0.0.2, PC3: 10.0.0.3, PC4: 10.0.0.4) and connect these to PC1.
Tuesday, December 2, 2008
Complete FTP Session - BASH
A Complete Example FTP Session
Let us now look at an examle FTP where many of the commands above are used in practice. We do the following:- connect to the year1 server -- open,
- list the files -- dir,
- change directory -- cd,
- list directories contents -- dir,
- set binary transfer mode: to download the gif file correctly -- (bin)ary,
- download a single file -- get
- turn prompt on: to allow interactive multiple get),
- perform a multiple get: note prompt we get and MUST acknowledge -- mget, and
- finally close the connection .
The FTP Session looks like this:
ftp> open ftp.cs.cf.ac.uk

Connected to thrall.cs.cf.ac.uk.
220-************************************************************************
220- Cardiff Computer Science campus ftp access. Access is available
220- here as anonymous, by ftp group or by username/password.
220-
220- The programs and data held on this system are the property of the
220- Department of Computer Science in the University of Wales, Cardiff.
220- They are lawfully available to authorised Departmental users only.
220- Access to any data or program must be authorised by the Department
220- of Computer Science.
220-
220- It is a criminal offence to secure unauthorised access to any programs
220- or data on this computer system or to make any unauthorised
220- modification to its contents.
220-
220- Offenders are liable to criminal prosecution.  If you are not an
220- authorised user do not log in.
220-************************************************************************
220-
220-Cardiff University.  Department of Computer Science.
220-This is the WUSL ftp daemon.  Please report problems to
220-Robert.Evans@cs.cf.ac.uk.
220-
220 thrall.cs.cf.ac.uk FTP server (Version wu-2.6.1(1) Mon Sep 18 12:45:30 BST 2000) ready.
Name (ftp.cs.cf.ac.uk:dave): year1
331 Password required for year1.
Password:
230-
230-Welcome to the guest ftp server for Year 1 Internet Computing
230-in the Department of Computer Science at the University of Wales, Cardiff.
230-
230-Please note that all commands and transfers from this ftp account
230-are logged and kept in an audit file.
230-
230-
230 User year1 logged in.  Access restrictions apply.

ftp> dir

200 PORT command successful.
150 Opening ASCII mode data connection for /bin/ls.
total 32
drwxrwxrwx   2 y1ftp       2048 Nov  8  1999 ex_gif
drwxrwxrwx   2 y1ftp       2048 Nov  8  1999 ex_hqx
drwxrwxrwx   2 y1ftp       2048 Nov  8  1999 ex_text
drwxrwxrwx   2 y1ftp       2048 Nov  8  1999 ex_uu
drwxrwxrwx   2 y1ftp       2048 Nov  8  1999 ex_zip
drwxr-xr-x   2 y1ftp        512 Oct 18  1999 exercise
drwxrwxr-x   2 gueftp      2048 Nov  5  1999 incoming
drwx--x--x   2 staff       1024 Nov 11  1999 marker
drwxrwxr-x   2 gueftp      2048 Nov 10  1999 test
226 Transfer complete.
489 bytes received in 0.0032 seconds (148.17 Kbytes/s)

ftp> cd exercise

250 CWD command successful.
ftp> dir
200 PORT command successful.
150 Opening ASCII mode data connection for /bin/ls.
total 156
-rw-rw-r--   1 staff      25943 Dec  8  1997 ex.gif
-rw-rw-r--   1 staff      53104 Oct 18  1999 ex.txt
226 Transfer complete.
117 bytes received in 0.0066 seconds (17.22 Kbytes/s)

ftp> bin

200 Type set to I.
ftp> get ex.gif
200 PORT command successful.
150 Opening BINARY mode data connection for ex.gif (25943 bytes).
226 Transfer complete.
local: ex.gif remote: ex.gif
25943 bytes received in 0.072 seconds (350.60 Kbytes/s)
ftp> prompt
Interactive mode on.

ftp> mget *.*

mget ex.gif? y
200 PORT command successful.
150 Opening BINARY mode data connection for ex.gif (25943 bytes).
226 Transfer complete.
local: ex.gif remote: ex.gif
25943 bytes received in 0.067 seconds (378.46 Kbytes/s)
mget ex.txt? y
200 PORT command successful.
150 Opening BINARY mode data connection for ex.txt (53104 bytes).
226 Transfer complete.
local: ex.txt remote: ex.txt
53104 bytes received in 0.13 seconds (387.51 Kbytes/s)

ftp> close

221-You have transferred 184037 bytes in 5 files.
221-Total traffic for this session was 186865 bytes in 9 transfers.
221-Thank you for using the FTP service on thrall.cs.cf.ac.uk.
221 Goodbye.
ftp>
Make sure that you can pick out the different ftp commands and responses in this output. Notice that the ftp responses are only displayed when the verbose feature is turned on.
Taken From: http://www.cs.cf.ac.uk/Dave/Internet/node118.html
Thursday, November 13, 2008
HTC Diamond as a Rndis Modem (GPRS/EDGE/HSDPA)
Using HTC Diamond as a Rndis modem
Hi, after a small amount of investigation I have finally got the HTC Diamond working as a Rndis modem over the USB port.
What this means is that you can use the Internet connection sharing function of the Diamond to get a computer onto the Internet using the H or G phone data connection.
Please note that the first steps of this guide will work for any ACTIVESYNC connected HTC phone that has the Connection Sharing (it's in the Connection Manager on other HTC phones)
Obviously using data on your mobile costs money so be aware of this and make sure you have a package that has reasonable charges.
finally I have only tested this on an ORANGE HTC Diamond in the UK.
The reason you have to modify the source is that if you don't the rndis fails with an error like (this is seen in the /var/log/syslog)
Code:
[355.215268] rndis_host 5-3:1.0: dev can't take 1558 byte packets (max 1536)
you need a working internet connection to set this up
1. Install Pre-requisites
2. Get the Source
3. Modify the source (Diamond only)
4. Compile and make and install
5. Start the Internet Connection Sharing
6. Plug in the Phone (USB)
Once you have done steps 1-4 you will only ever need to do steps 5 & 6 to get re-connected.
Step 1 - Install Pre-requisites
open a terminal (use same terminal in next steps)
Code:
$ sudo apt-get install subversion
Step 2 - Get the Source
Code:
$ svn co http://synce.svn.sourceforge.net/svnroot/synce/trunk/usb-rndis-lite
cd usb-rndis-lite/
Step 3 - Modify the source (Diamond only)
Code:
$ gedit rndis_host.c
on line 524, find this bit
Code:
if (tmp <>hard_mtu) {
dev_err(&intf->dev,
"dev can't take %u byte packets (max %u)\n",
dev->hard_mtu, tmp);
goto fail;
}
change it to this
Code:
if (tmp <>hard_mtu) {
dev_err(&intf->dev,
"dev can't take %u byte packets (max %u)\n",
dev->hard_mtu, tmp);
retval = -EINVAL;
/* goto fail;*/
}
save the file
Step 4 - Compile and make and install
Code:
$ make
$ sudo ./clean.sh
$ sudo make install
Step 5 - Start the Internet Connection Sharing
On OLD Tytn II's open Comm Manager on your phone and click on the Internet Sharing Now make sure USB is selected and choose connect
On Diamonds it's a seperate program called Internet Connection Sharing
Step 6 - Plug in the Phone (USB)
Plug the phone in, once the Phone has a data connection the Internet connection sharing will say connecting, then connected.
If this takes a while the dhcp may timeout and you will have to run the following command.
Code:
$ sudo dhclient
You should then see that you have an ip on the rndis device
Code:
$ ifconfig
Taken From: http://ubuntuforums.org/archive/index.php/t-935203.html
Monday, October 27, 2008
Change Your Mac Address in Linux
# In order to change your MAC address just type the following:
$ sudo ifconfig eth0 down hw ether 0A:0B:0C:0D:AA:BB
Note: "0A:0B:0C:0D:AA:BB" is just an example, you should put there the disired MAC address
Note: bringing down the interface (sudo ifconfig eth0 down) and them changing the mac address (sudo ifconfig eth0 hw ether 0A:0B:0C:0D:AA:BB) did not work, instead i did all in one line as shown above
# Now bring the interface back up, and you are ready to go.
$ sudo ifconfig eth0 up
Wednesday, October 15, 2008
Secured Remote Desktop/Application Sessions
Run graphical applications from afar, securely.

 Taken From: Linux Journal Contents #173, September 2008
There are many different ways to control a Linux system over a network, and many reasons you might want to do so. When covering remote control in past columns, I've tended to focus on server-oriented usage scenarios and tools, which is to say, on administering servers via text-based applications, such as OpenSSH. But, what about GUI-based applications and remote desktops?
Remote desktop sessions can be very useful for technical support, surveillance and remote control of desktop applications. But, it isn't always necessary to access an entire desktop; you may need to run only one or two specific graphical applications.
In this month's column, I describe how to use VNC (Virtual Network Computing) for remote desktop sessions and OpenSSH with X forwarding for remote access to specific applications. Our focus here, of course, is on using these tools securely, and I include a healthy dose of opinion as to the relative merits of each.
So, which approach should you use, remote desktops or remote applications? If you've come to Linux from the Microsoft world, you may be tempted to assume that because Terminal Services in Windows is so useful, you have to have some sort of remote desktop access in Linux too. But, that may not be the case.
Linux and most other UNIX-based operating systems use the X Window System as the basis for their various graphical environments. And, the X Window System was designed to be run over networks. In fact, it treats your local system as a self-contained network over which different parts of the X Window System communicate.
Accordingly, it's not only possible but easy to run individual X Window System applications over TCP/IP networks—that is, to display the output (window) of a remotely executed graphical application on your local system. Because the X Window System's use of networks isn't terribly secure (the X Window System has no native support whatsoever for any kind of encryption), nowadays we usually tunnel X Window System application windows over the Secure Shell (SSH), especially OpenSSH.
The advantage of tunneling individual application windows is that it's faster and generally more secure than running the entire desktop remotely. The disadvantages are that OpenSSH has a history of security vulnerabilities, and for many Linux newcomers, forwarding graphical applications via commands entered in a shell session is counterintuitive. And besides, as I mentioned earlier, remote desktop control (or even just viewing) can be very useful for technical support and for security surveillance.
Having said all that, tunneling X Window System applications over OpenSSH may be a lot easier than you imagine. All you need is a client system running an X server (for example, a Linux desktop system or a Windows system running the Cygwin X server) and a destination system running the OpenSSH dæmon (sshd).
Note that I didn't say “a destination system running sshd and an X server”. This is because X servers, oddly enough, don't actually run or control X Window System applications; they merely display their output. Therefore, if you're running an X Window System application on a remote system, you need to run an X server on your local system, not on the remote system. The application will execute on the remote system and send its output to your local X server's display.
Suppose you've got two systems, mylaptop and remotebox, and you want to monitor system resources on remotebox with the GNOME System Monitor. Suppose further you're running the X Window System on mylaptop and sshd on remotebox.
First, from a terminal window or xterm on mylaptop, you'd open an SSH session like this:
mick@mylaptop:~$ ssh -X admin-slave@remotebox
admin-slave@remotebox's password: **********
Last login: Wed Jun 11 21:50:19 2008 from dtcla00b674986d
admin-slave@remotebox:~$
Note the -X flag in my ssh command. This enables X Window System forwarding for the SSH session. In order for that to work, sshd on the remote system must be configured with X11Forwarding set to yes in its /etc/ssh/sshd.conf file. On many distributions, yes is the default setting, but check yours to be sure.
Next, to run the GNOME System Monitor on remotebox, such that its output (window) is displayed on mylaptop, simply execute it from within the same SSH session:
admin-slave@remotebox:~$ gnome-system-monitor &
The trailing ampersand (&) causes this command to run in the background, so you can initiate other commands from the same shell session. Without this, the cursor won't reappear in your shell window until you kill the command you just started.
At this point, the GNOME System Monitor window should appear on mylaptop's screen, displaying system performance information for remotebox. And, that really is all there is to it.
This technique works for practically any X Window System application installed on the remote system. The only catch is that you need to know the name of anything you want to run in this way—that is, the actual name of the executable file.
If you're accustomed to starting your X Window System applications from a menu on your desktop, you may not know the names of their corresponding executables. One quick way to find out is to open your desktop manager's menu editor, and then view the properties screen for the application in question.
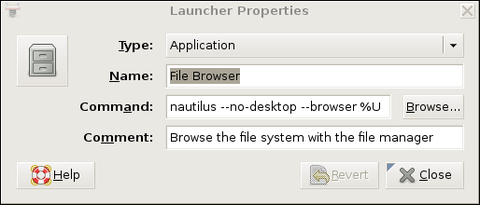
For example, on a GNOME desktop, you would right-click on the Applications menu button, select Edit Menus, scroll down to System/Administration, right-click on System Monitor and select Properties. This pops up a window whose Command field shows the name gnome-system-monitor.
Figure 1 shows the Launcher Properties, not for the GNOME System Monitor, but instead for the GNOME File Browser, which is a better example, because its launcher entry includes some command-line options. Obviously, all such options also can be used when starting X applications over SSH.
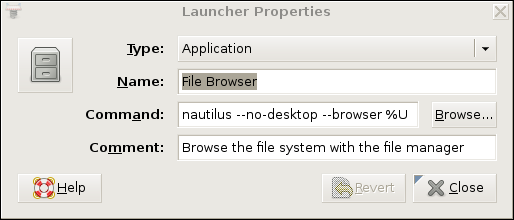
Figure 1. Launcher Properties for the GNOME File Browser (Nautilus)
If this sounds like too much trouble, or if you're worried about accidentally messing up your desktop menus, you simply can run the application in question, issue the command ps auxw in a terminal window, and find the entry that corresponds to your application. The last field in each row of the output from ps is the executable's name plus the command-line options with which it was invoked.
Once you've finished running your remote X Window System application, you can close it the usual way (selecting Exit from its File menu, clicking the x button in the upper right-hand corner of its window and so forth). Don't forget to close your SSH session too, by issuing the command exit in the terminal window where you're running SSH.
Now that I've shown you the preferred way to run remote X Window System applications, let's discuss how to control an entire remote desktop. In the Linux/UNIX world, the most popular tool for this is Virtual Network Computing, or VNC.
Originally a project of the Olivetti Research Laboratory (which was subsequently acquired by Oracle and then AT&T before being shut down), VNC uses a protocol called Remote Frame Buffer (RFB). The original creators of VNC now maintain the application suite RealVNC, which is available in free and commercial versions, but TightVNC, UltraVNC and GNOME's vino VNC server and vinagre VNC client also are popular.
VNC's strengths are its simplicity, ubiquity and portability—it runs on many different operating systems. Because it runs over a single TCP port (usually TCP 5900), it's also firewall-friendly and easy to tunnel.
Its security, however, is somewhat problematic. VNC authentication uses a DES-based transaction that, if eavesdropped-on, is vulnerable to optimized brute-force (password-guessing) attacks. This vulnerability is exacerbated by the fact that many versions of VNC support only eight-character passwords.
Furthermore, VNC session data usually is transmitted unencrypted. Only a couple flavors of VNC support TLS encryption of RFB streams, and it isn't clear how securely TLS has been implemented even in those. Thus, an attacker using a trivially hacked VNC client may be able to reconstruct and view eavesdropped VNC streams.
Luckily, as it operates over a single TCP port, VNC is easy to tunnel through SSH, through Virtual Private Network (VPN) sessions and through TLS/SSL wrappers, such as stunnel. Let's look at a simple VNC-over-SSH example.
To tunnel VNC over SSH, your remote system must be running an SSH dæmon (sshd) and a VNC server application. Your local system must have an SSH client (ssh) and a VNC client application.
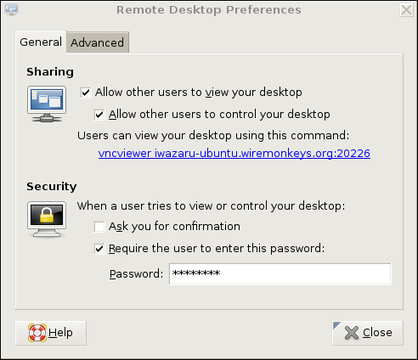
Our example remote system, remotebox, already is running sshd. Suppose it also has vino, which is also known as the GNOME Remote Desktop Preferences applet (on Ubuntu systems, it's located in the System menu's Preferences section). First, presumably from remotebox's local console, you need to open that applet and enable remote desktop sharing. Figure 2 shows vino's General settings.
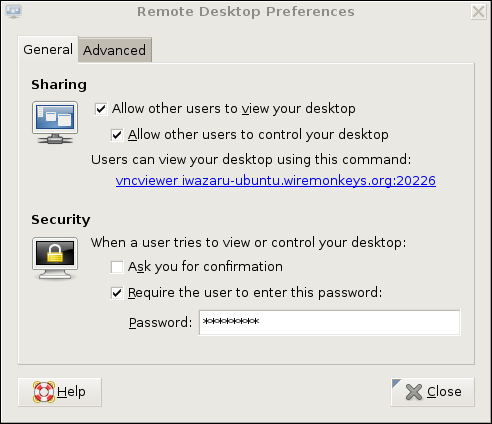
Figure 2. General Settings in GNOME Remote Desktop Preferences (vino)
If you want to view only this system's remote desktop without controlling it, uncheck Allow other users to control your desktop. If you don't want to have to confirm remote connections explicitly (for example, because you want to connect to this system when it's unattended), you can uncheck the Ask you for confirmation box. Any time you leave yourself logged in to an unattended system, be sure to use a password-protected screensaver!
vino is limited in this way. Because vino is loaded only after you log in, you can use it only to connect to a fully logged-in GNOME session in progress—not, for example, to a gdm (GNOME login) prompt. Unlike vino, other versions of VNC can be invoked as needed from xinetd or inetd. That technique is out of the scope of this article, but see Resources for a link to a how-to for doing so in Ubuntu, or simply Google the string “vnc xinetd”.
Continuing with our vino example, don't close that Remote Desktop Preferences applet yet. Be sure to check the Require the user to enter this password box and to select a difficult-to-guess password. Remember, vino runs in an already-logged-in desktop session, so unless you set a password here, you'll run the risk of allowing completely unauthenticated sessions (depending on whether a password-protected screensaver is running).
If your remote system will be run logged in but unattended, you probably will want to uncheck Ask you for confirmation. Again, don't forget that locked screensaver.
We're not done setting up vino on remotebox yet. Figure 3 shows the Advanced Settings tab.
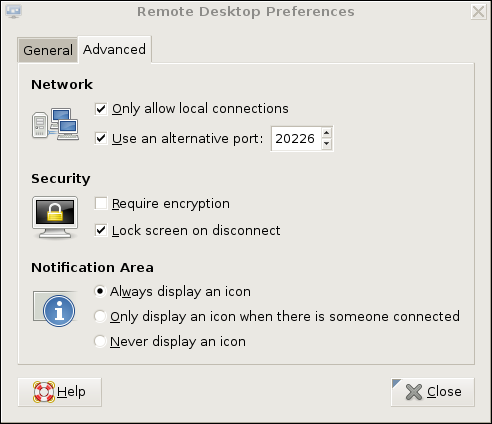
Figure 3. Advanced Settings in GNOME Remote Desktop Preferences (vino)
Several advanced settings are particularly noteworthy. First, you should check Only allow local connections, after which remote connections still will be possible, but only via a port-forwarder like SSH or stunnel. Second, you may want to set a custom TCP port for vino to listen on via the Use an alternative port option. In this example, I've chosen 20226. This is an instance of useful security-through-obscurity; if our other (more meaningful) security controls fail, at least we won't be running VNC on the obvious default port.
Also, you should check the box next to Lock screen on disconnect, but you probably should not check Require encryption, as SSH will provide our session encryption, and adding redundant (and not-necessarily-known-good) encryption will only increase vino's already-significant latency. If you think there's only a moderate level of risk of eavesdropping in the environment in which you want to use vino—for example, on a small, private, local-area network inaccessible from the Internet—vino's TLS implementation may be good enough for you. In that case, you may opt to check the Require encryption box and skip the SSH tunneling.
(If any of you know more about TLS in vino than I was able to divine from the Internet, please write in. During my research for this article, I found no documentation or on-line discussions of vino's TLS design details whatsoever—beyond people commenting that the soundness of TLS in vino is unknown.)
This month, I seem to be offering you more “opt-out” opportunities in my examples than usual. Perhaps I'm becoming less dogmatic with age. Regardless, let's assume you've followed my advice to forego vino's encryption in favor of SSH.
At this point, you're done with the server-side settings. You won't have to change those again. If you restart your GNOME session on remotebox, vino will restart as well, with the options you just set. The following steps, however, are necessary each time you want to initiate a VNC/SSH session.
On mylaptop (the system from which you want to connect to remotebox), open a terminal window, and type this command:
mick@mylaptop:~$ ssh -L 20226:remotebox:20226 admin-slave@remotebox
OpenSSH's -L option sets up a local port-forwarder. In this example, connections to mylaptop's TCP port 20226 will be forwarded to the same port on remotebox. The syntax for this option is “-L [localport]:[remote IP or hostname]:[remoteport]”. You can use any available local TCP port you like (higher than 1024, unless you're running SSH as root), but the remote port must correspond to the alternative port you set vino to listen on (20226 in our example), or if you didn't set an alternative port, it should be VNC's default of 5900.
That's it for the SSH session. You'll be prompted for a password and then given a bash prompt on remotebox. But, you won't need it except to enter exit when your VNC session is finished. It's time to fire up your VNC client.
vino's companion client, vinagre (also known as the GNOME Remote Desktop Viewer) is good enough for our purposes here. On Ubuntu systems, it's located in the Applications menu in the Internet section. In Figure 4, I've opened the Remote Desktop Viewer and clicked the Connect button. As you can see, rather than remotebox, I've entered localhost as the hostname. I've also entered port number 20226.
Figure 4. Using vinagre to Connect to an SSH-Forwarded Local Port
When I click the Connect button, vinagre connects to mylaptop's local TCP port 20226, which actually is being listened on by my local SSH process. SSH forwards this connection attempt through its encrypted connection to TCP 20226 on remotebox, which is being listened on by remotebox's vino process.
At this point, I'm prompted for remotebox's vino password (shown in Figure 2). On successful authentication, I'll have full access to my active desktop session on remotebox.
To end the session, I close the Remote Desktop Viewer's session, and then enter exit in my SSH session to remotebox—that's all there is to it.
This technique is easy to adapt to other versions of VNC servers and clients, and probably also to other versions of SSH—there are commercial alternatives to OpenSSH, including Windows versions. I mentioned that VNC client applications are available for a wide variety of platforms; on any such platform, you can use this technique, so long as you also have an SSH client that supports port forwarding.
Thus ends my crash course on how to control graphical applications over networks. I hope my examples of both techniques, SSH with X forwarding and VNC over SSH, help you get started with whatever particular distribution and software packages you prefer. Be safe!
Subscribe to:
Posts (Atom)