[ Login & Password ]
[ Assign IP address ]
[ Login & Password ]
A2(SU)-> set system login 'username' {super-user|read-write|read-only}{enale|disable}
A2(SU)-> clear system login 'username'
A2(SU)-> show system login
for rw and ro = set password
for admin = set system login
A2(SU)-> set password rw
A2(SU)-> set system password length 7
[ Assign IP address ]
[ Webview ]
A2(SU)-> save config
[ Configure ]
[ Configuration example ]
Enterasys_A2(SU)-> show system login
Password history size: 0
Password aging : disabled
Username Access State
admin super-user enabled
ro read-Only enabled
rw read-write enabled
chris super-user enabled
Enterasys_A2(SU)-> clear system login chris
If you want to change password length 7
[ Syslog Server ]
Enterasys(su)>set logging server 1 ip-addr 192.168.77.12 port 514 severity 8 state enable
IP Address Facility Severity Description Port Status
--------------------------------------------------------------- 1 192.168.77.12 local4 debugging(8) default 514 enable
Enterasys(su)>set logging default facility local 5 severity 5
Enterasys(su)>show logging application all
Application Current Severity Level
---------------------------------------------
89 CLIWEB 6
90 SNMP 6
91 STP 6
92 Driver 6
93 System 6
94 Stacking 6
112 UPN 6
118 Router 6
1(emergencies) 2(alerts) 3(critical)
4(errors) 5(warnings) 6(notifications)
7(information) 8(debugging)
Console(Config)#interface Ethernet 1/1
Console(Config-if)#port monitor Ethernet 1/4
Console(Config-if)#
[ Upgrade Firmware ]
- Model : C3G124-48
- Firmware : 01.01.02.0007
"set ip address 192.168.1.8 mask 255.255.255.0 gateway 192.168.1.254"
Enterasys(su)->copy tftp://192.168.1.47/c3-series_01.02.04.0005 system:image

Taken From: http://www.ipbalance.com/vendor/enterasys/473-enterasys-stackable-c2-switch-tips-and-commands.html
Enterasys C2 (Configuration Guide) : http://www.penteknoloji.com.tr/destek/c2/1.pdf
Enterasys C3 (Configuration Guide): http://www.penteknoloji.com.tr/destek/c3/2.pdf
If admin / siemens doesn't work, try admin/none
default, no pwd, just enter
user : admin, rw, ro
C2(SU)-> set system login 'username' {super-user|read-write|read-only}{enale|disable}
default, no pwd, just enter
user : admin, rw, ro
C2(SU)-> set system login 'username' {super-user|read-write|read-only}{enale|disable}
C2(SU)-> clear system login 'username'
C2(SU)-> show system login
C2(SU)-> show system login
for rw and ro = set password
for admin = set system login
for admin = set system login
C2(SU)-> set password rw
C2(SU)-> set system password length 7
C2(SU)-> set system password length 7
[ Assign IP address ]
C2(SU)-> set ip address x.x.x.x mask x.x.x.x gateway x.x.x.x
C2(SU)-> clear ip address
C2(SU)-> clear ip address
[ Webview ]
Default : enable
C2(SU)-> show webview : to see status of webview (default enable)
C2(SU)-> set webview enable : to enable webview
- login : http://172.16.2.10
C2(SU)-> show webview
WebView is Enabled
C2(SU)-> show webview : to see status of webview (default enable)
C2(SU)-> set webview enable : to enable webview
- login : http://172.16.2.10
C2(SU)-> show webview
WebView is Enabled
[ Set time ]
C2(SU)-> set time 7:50:00
C2(SU)-> set summertime enable
C2(SU)-> set summertime enable
[ Set prompt ]
C2(SU)-> set prompt "switch 1"
[ Set system contact ]
C2(SU)-> set system name "Enterasys-C2.1"
C2(SU)-> set system location "Main Bldg 2nd Floor"
C2(SU)-> set system contact "ipBalance Admin ( 888-999-0000 )Mr.admin@ipBalance.com This e-mail address is being protected from spambots. You need JavaScript enabled to view it "
C2(SU)-> set system location "Main Bldg 2nd Floor"
C2(SU)-> set system contact "ipBalance Admin ( 888-999-0000 )Mr.admin@ipBalance.com This e-mail address is being protected from spambots. You need JavaScript enabled to view it "
[ Save configuration ]
C2(SU)-> save config
[ Configure ]
C2(SU)-> configure configs/Jan1_2004.cfg
[ Set command ]
C2(SU)-> set switch description 1 : describe switch name or location
C2(SU)-> set ip address {x.x.x.x} mask {255.255.255.0} gateway {x.x.x.x}
C2(SU)-> clear ip address
C2(SU)-> set time [mm/dd/yyyy][hh:mm:ss]
C2(SU)-> set logout 10 : closing session idle in 10 min
C2(SU)-> set port [enable|diable]
C2(SU)-> set port duplex
C2(SU)-> set cdp state disable fe.1.2
C2(SU)-> set cdp state disable fe.1.3
C2(SU)-> set vlan create 2
C2(SU)-> set vlan create 3
C2(SU)-> set vlan name 1 Management
C2(SU)-> set vlan egress 1 fe.1.1 tagged
C2(SU)-> set vlan egress 1 fe.1.22 untagged
C2(SU)-> set vlan egress 2 fe.1.1 tagged
C2(SU)-> set vlan egress 2 fe.1.2-14 untagged
C2(SU)-> set port alias fe.1.1 'To Computer room N1.1 Port 2'
C2(SU)-> set port vlan fe.1.14 2
[ show ]
C2(SU)-> show config port
C2(SU)-> show switch
C2(SU)-> show switch status 1
C2(SU)-> show system
C2(SU)-> show system hardware : to get serial#, MAC, Firmware version etc
C2(SU)-> show system utilization {cpu|storage}
C2(SU)-> show time
C2(SU)-> show console
C2(SU)-> show telnet
C2(SU)-> show system login : user login account info
C2(SU)-> show system lockout
C2(SU)-> show ip address
C2(SU)-> show ip protocol : shown "system IP address acquisition method: dhcp
C2(SU)-> show config port
C2(SU)-> show cdp
C2(SU)-> show port fe.1.14 (ex, show port *.*.*)
C2(SU)-> show port status fe.1.14 : shown on status of information for fe.1.14
C2(SU)-> show port counters fe.1.14
C2(SU)-> show port negotiation fe.1.14
C2(SU)-> show port broadcast fe.1.14
C2(SU)-> show spantree stats
C2(SU)-> show boot system
[ Lag ]
C2(SU)-> show lacp lag 0.1
C2(SU)-> set lacp enable
C2(SU)-> set lacp asyspri 1000
C2(SU)-> set lacp aadminkey lag.0.1 2000
C2(SU)-> set lacp static lag.0.6 fe.1.6
C2(SU)-> set lacp singleportlag enable
C2(SU)-> set port lacp fe.3.16 aadminkey 3555
C2(SU)-> set lacp enable
C2(SU)-> set lacp asyspri 1000
C2(SU)-> set lacp aadminkey lag.0.1 2000
C2(SU)-> set lacp static lag.0.6 fe.1.6
C2(SU)-> set lacp singleportlag enable
C2(SU)-> set port lacp fe.3.16 aadminkey 3555
[ Clear ]
C2(SU)-> clear config
C2(SU)-> clear vlan 3
C2(SU)-> clear vlan name 9
C2(SU)-> clear port vlan fe.1.3,fe.1.11
C2(SU)-> clear vlan egress 1 fe2.1
C2(SU)-> clear VNRAM
C2(SU)-> clear vlan 3
C2(SU)-> clear vlan name 9
C2(SU)-> clear port vlan fe.1.3,fe.1.11
C2(SU)-> clear vlan egress 1 fe2.1
C2(SU)-> clear VNRAM
[ Reset ]
C2(SU)-> reset or reset 1 : reload switch 1
[ Configuration example ]
C2(SU)-> dir
C2(SU)-> show configuration outfile configs/
C2(SU)-> copy configs/ tftp://192.168.77.101/
using notepad, modify config
C2(SU)-> copy tftp://192.168.77.101/jan11_2006.cfg configs/jan11_2006.cfg
C2(SU)-> dir
C2(SU)-> configure configs/ : unit will reboot onto the modified config file
C2(SU)-> configure configs/Jan11_2006.cfg : to execute the"jan11_2006.cfg" configurationn file
C2(SU)-> delete configs/jan11_2006.cfg
C2(SU)-> clear config all
C2(SU)-> clear NVRAM
C2(SU)-> show snmp persistmode manual : manual save config
C2(SU)-> save config
[ Login & Password ]
If admin / siemens doesn't work, try admin/none
default, no pwd, just enter
user : admin, rw, ro
default, no pwd, just enter
user : admin, rw, ro
A2(SU)-> set system login 'username' {super-user|read-write|read-only}{enale|disable}
A2(SU)-> clear system login 'username'
A2(SU)-> show system login
for rw and ro = set password
for admin = set system login
A2(SU)-> set password rw
A2(SU)-> set system password length 7
[ Assign IP address ]
A2(SU)-> set ip address x.x.x.x mask x.x.x.x gateway x.x.x.x
A2(SU)-> clear ip address
A2(SU)-> clear ip address
[ Webview ]
Default : enable
A2(SU)-> show webview : to see status of webview (default enable)
A2(SU)-> set webview enable : to enable webview
- login : http://172.16.2.10
A2(SU)-> show webview
WebView is Enabled
A2(SU)-> show webview : to see status of webview (default enable)
A2(SU)-> set webview enable : to enable webview
- login : http://172.16.2.10
A2(SU)-> show webview
WebView is Enabled
[ Set time ]
A2(SU)-> set time 7:50:00
A2(SU)-> set summertime enable
A2(SU)-> set summertime enable
[ Set prompt ]
A2(SU)-> set prompt "switch 1"
[ Set system contact ]
A2(SU)-> set system name "Enterasys-A2.1"
A2(SU)-> set system location "Main Bldg 2nd Floor"
A2(SU)-> set system contact "ipBalance Admin ( 888-999-0000 ) Mr.admin@ipBalance.com "
[ Set system contact ]
A2(SU)-> set system name "Enterasys-A2.1"
A2(SU)-> set system location "Main Bldg 2nd Floor"
A2(SU)-> set system contact "ipBalance Admin ( 888-999-0000 ) Mr.admin@ipBalance.com "
[ Save configuration ]
A2(SU)-> save config
[ Configure ]
A2(SU)-> configure configs/Jan1_2004.cfg
[ Set command ]
A2(SU)-> set switch description 1 : describe switch name or location
A2(SU)-> set ip address {x.x.x.x} mask {255.255.255.0} gateway {x.x.x.x}
A2(SU)-> clear ip address
A2(SU)-> set time [mm/dd/yyyy][hh:mm:ss]
A2(SU)-> set logout 10 : closing session idle in 10 min
A2(SU)-> set port [enable|diable]
A2(SU)-> set port duplex
A2(SU)-> set cdp state disable fe.1.2
A2(SU)-> set cdp state disable fe.1.3
A2(SU)-> set vlan create 2
A2(SU)-> set vlan create 3
A2(SU)-> set vlan name 1 Management
A2(SU)-> set vlan egress 1 fe.1.1 tagged
A2(SU)-> set vlan egress 1 fe.1.22 untagged
A2(SU)-> set vlan egress 2 fe.1.1 tagged
A2(SU)-> set vlan egress 2 fe.1.2-14 untagged
A2(SU)-> set port alias fe.1.1 'To Computer room N1.1 Port 2'
A2(SU)-> set port vlan fe.1.14 2
[ show ]
A2(SU)-> show config port :
A2(SU)-> show switch
A2(SU)-> show switch status 1
A2(SU)-> show system
A2(SU)-> show system hardware : to get serial#, MAC, Firmware version etc
A2(SU)-> show system utilization {cpu|storage}
A2(SU)-> show time
A2(SU)-> show console
A2(SU)-> show telnet
A2(SU)-> show system login : user login account info
A2(SU)-> show system lockout
A2(SU)-> show ip address
A2(SU)-> show ip protocol : shown "system IP address acquisition method: dhcp
A2(SU)-> show config port
A2(SU)-> show cdp
A2(SU)-> show port fe.1.14 (ex, show port *.*.*)
A2(SU)-> show port status fe.1.14 : shown on status of information for fe.1.14
A2(SU)-> show port counters fe.1.14
A2(SU)-> show port negotiation fe.1.14
A2(SU)-> show port broadcast fe.1.14
A2(SU)-> show spantree stats
A2(SU)-> show boot system
[ Lag ]
A2(SU)-> show lacp lag 0.1
A2(SU)-> show lacp lag 0.1
A2(SU)-> set lacp enable
A2(SU)-> set lacp asyspri 1000
A2(SU)-> set lacp aadminkey lag.0.1 2000
A2(SU)-> set lacp static lag.0.6 fe.1.6
A2(SU)-> set lacp singleportlag enable
A2(SU)-> set port lacp fe.3.16 aadminkey 3555
A2(SU)-> set lacp asyspri 1000
A2(SU)-> set lacp aadminkey lag.0.1 2000
A2(SU)-> set lacp static lag.0.6 fe.1.6
A2(SU)-> set lacp singleportlag enable
A2(SU)-> set port lacp fe.3.16 aadminkey 3555
[ Clear ]
A2(SU)-> clear config
A2(SU)-> clear vlan 3
A2(SU)-> clear vlan name 9
A2(SU)-> clear port vlan fe.1.3,fe.1.11
A2(SU)-> clear vlan egress 1 fe2.1
A2(SU)-> clear VNRAM
A2(SU)-> clear vlan 3
A2(SU)-> clear vlan name 9
A2(SU)-> clear port vlan fe.1.3,fe.1.11
A2(SU)-> clear vlan egress 1 fe2.1
A2(SU)-> clear VNRAM
[ Reset ]
A2(SU)-> reset or reset 1 : reload switch 1
[ Configuration example ]
A2(SU)-> dir
A2(SU)-> show configuration outfile configs/
A2(SU)-> copy configs/ tftp://192.168.77.101/
using notepad, modify config
A2(SU)-> copy tftp://192.168.77.101/jan11_2006.cfg configs/jan11_2006.cfg
A2(SU)-> dir
A2(SU)-> configure configs/ : unit will reboot onto the modified config file
A2(SU)-> configure configs/Jan11_2006.cfg : to execute the"jan11_2006.cfg" configurationn file
A2(SU)-> delete configs/jan11_2006.cfg
A2(SU)-> clear config all
A2(SU)-> clear NVRAM
A2(SU)-> show snmp persistmode manual : manual save config
A2(SU)-> save config
[ Default Login & Password ]
Here is default login passwords of the most Enterasys Switches.
A-Series, B-Series and C-Series Enterasys Switches.
User : admin
Password : [empty]
Try below commends to see current login
A-Series, B-Series and C-Series Enterasys Switches.
User : admin
Password : [empty]
Try below commends to see current login
Enterasys_A2(SU)-> show system login
Password history size: 0
Password aging : disabled
Password aging : disabled
Username Access State
admin super-user enabled
ro read-Only enabled
rw read-write enabled
admin super-user enabled
ro read-Only enabled
rw read-write enabled
To add user 'Chris' as a super-user
Enterasys_A2(SU)-> set system login chris super-user enable
Enterasys_A2(SU)-> show system login
Enterasys_A2(SU)-> show system login
Password history size: 0
Password aging : disabled
Username Access State
admin super-user enabled
ro read-Only enabled
rw read-write enabled
chris super-user enabled
To delete user 'chris' from list
Enterasys_A2(SU)-> clear system login chris
If you want to change password length 7
Enterasys_A2(SU)-> set system password length 7
[ Syslog Server ]
While I was testing Splunk, I need to add more devices to Splunk index pages. This example shows how to configure Enterasys Switch to forward syslog message to the server. It's simple and easy to setup.
In this example, server's IP is 192.168.77.13 and UDP port 514 is used. Severity level is 8.
Enterasys(su)>set logging server 1 ip-addr 192.168.77.12 port 514 severity 8 state enable
To verify
Enterasys(su)>show logging server
IP Address Facility Severity Description Port Status
--------------------------------------------------------------- 1 192.168.77.12 local4 debugging(8) default 514 enable
If you want to change default value to facility local 5 and severity 5, configure below.
Enterasys(su)>set logging default facility local 5 severity 5
To see currently logging severity levels for all applications on your devices, type below commands
Enterasys(su)>show logging application all
Application Current Severity Level
---------------------------------------------
89 CLIWEB 6
90 SNMP 6
91 STP 6
92 Driver 6
93 System 6
94 Stacking 6
112 UPN 6
118 Router 6
1(emergencies) 2(alerts) 3(critical)
4(errors) 5(warnings) 6(notifications)
7(information) 8(debugging)
[ Port Mirroring ]
source port 1/13
destinaion port 1/10
destinaion port 1/10
Console(Config)#interface Ethernet 1/1
Console(Config-if)#port monitor Ethernet 1/4
Console(Config-if)#
[ Upgrade Firmware ]
As you know Enterasys was named Cabletron company long long time ago. I guess more than decade Cabletron was one of strong vendor on switches market at that time. Due to I had really good experience with Cabletron product, I trust Enterasys's product line. Actually, I installed many Enterasys switches since 2005. Today, I just want to share a tip to upgrade firmware on Enterasys switches. Compare to generic 3rd party switch vendors, Enterasys release new firmware more often. Well, some of people might say due to all lot of bugs, but I like to say "Diligent and effort" (too much?).There are detailed documents from vendor, but this guide would be easier for beginner. Well, lets see what the steps to complete upgrading firmware are.
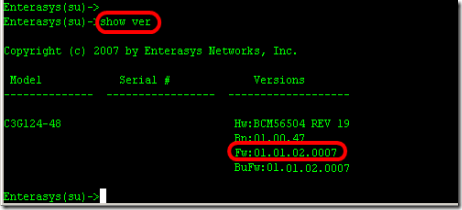
1. Find out what model of switch you are upgrading and what is current version of firmware running on the switch. Type "Show version" from the prompt.
1. Find out what model of switch you are upgrading and what is current version of firmware running on the switch. Type "Show version" from the prompt.
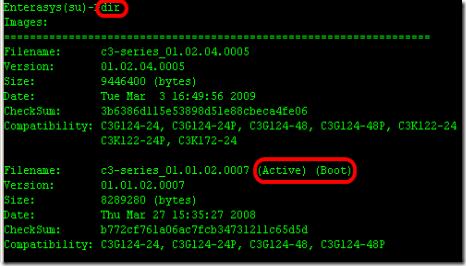
- Model : C3G124-48
- Firmware : 01.01.02.0007
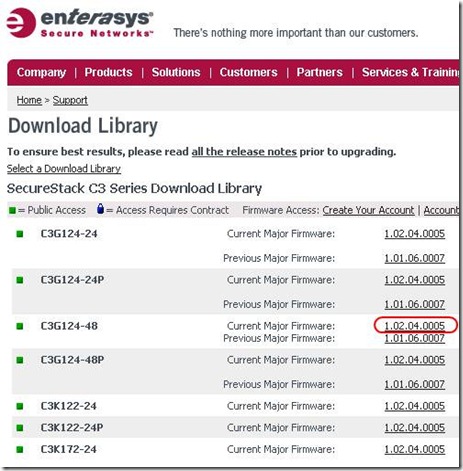
2. Go to the website "www.enterasys.com" and download proper firmware from the download library. and extract firmware to any folder your tftp server will use.
3. Assign IP address on the Enterasys switch in order to communicate with you computer which is running tftp server.
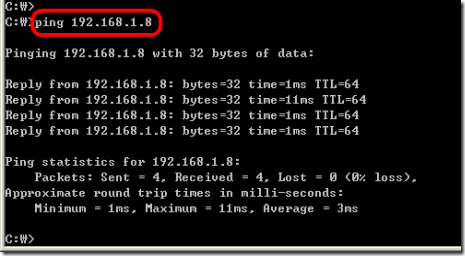
ex) computer 192.168.1.47, Enterasys switch is 192.168.1.8, default gateway .254
ex) computer 192.168.1.47, Enterasys switch is 192.168.1.8, default gateway .254
"set ip address 192.168.1.8 mask 255.255.255.0 gateway 192.168.1.254"
4. Ping the Enterasys switch from your computer.
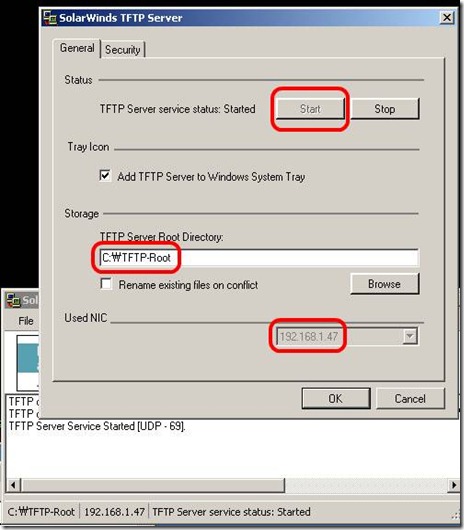
5. Execute tftp server. (If you don't have, just down one from solarwinds)
6. Copy firmware from tftp server
Enterasys(su)->copy tftp://192.168.1.47/c3-series_01.02.04.0005 system:image
- I will take time...to be done (few minutes)
7. From the switch, make sure new firmware is uploaded and check which firmware version is on active.
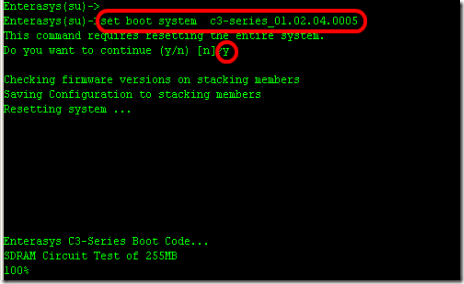
8. Type to "set boot system c3-series_01.02.04.0005" to booting up switch with new firmware(active).
B2(su)>>set boot system c3-series_01.02.04.0005
Do you want to replace ? (y/n) y
Do you want to replace ? (y/n) y
Automatically Enterasys switch will reboot.
9. Confirm now, new firmware is on active status.

Taken From: http://www.ipbalance.com/vendor/enterasys/473-enterasys-stackable-c2-switch-tips-and-commands.html
The complete CLI reference manuals can be found at:
Enterasys C2 (Configuration Guide) : http://www.penteknoloji.com.tr/destek/c2/1.pdf
Enterasys C3 (Configuration Guide): http://www.penteknoloji.com.tr/destek/c3/2.pdf

4 comments:
Hi. thanks for your posts. regarding your experiences on Enterasys, I have a situation that I want to ask here. I have a simple network with 2 HP 3800 switches and an Enterasys S8. HP switches use RPVST and S8 uses RSTP. I changed the STP value on S8 to "0" or "4096" to make it Root, but after many attempts, one of HP switches with default STP priority (32768) is selected as root. is this mothods of STP is incomparable? as I know, they switch to CST (802.1D) if they could not use the same STP version. what is your idea?
Hello,
Spanning Tree, does not work well between diferent brands, and aldo RSTP does not work Well with RPVST, one as only one instance of spaning tree and the other has one instance per Vlan.
The alternative that works well between all brands is:
Multiple Spanning Tree (MST)
requires a bit more off config but works
thanks for sharing information,good blog..
Passive Networking
Structured Cabling
Very nice and informative blog. It really helped me add some useful points in my knowledge. Thanks for sharing!
Also check out these amazing Cisco products if you want:
C3850-NM-8-10G
C3850-NM-2-10G
C9200L-24P-4X-E
Post a Comment